Friday, December 25, 2009

Merry Christmas! - Gingerbread House


Merry Christmas! I hope everyone has had a wonderful day celebrating with family and friends and remembering the true meaning for the season! Thanks to all of you for checking out my blog the last 24 days as I counted down to Christmas with some holiday goodies. Maybe you even tried out some of my recipes for your holiday parties! Today, was not about baking for the blog (although I did make another one of those Peppermint Cakes to take to Christmas at my dad's side tomorrow) but it was about getting to have some fun and decorate a Gingerbread House with my sister!


I bought one of those pre-made Wilton gingerbread kits from Michaels and brought home so my sister, Emily and I could act like we were kids again and get creative. The kit came with the pieces of the gingerbread house already cut and ready to assemble, the icing mix and an assortment of candy to decorate.


Here's a picture of me and Emily with our finished gingerbread masterpiece!


Pictures of our gingerbread making process....


Emily was in charge of piping on most of the icing...she did a pretty good job considering she had never used a piping bag before! Maybe I could use her help as my cake decorating assistant...too bad we live so far away!


The back of our house.


Side view.
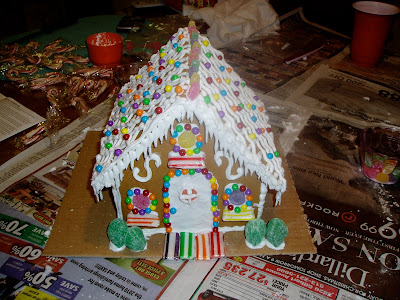
Now the question is what to do with the gingerbread house...eat it, keep it as decoration for a few days, or take it to our next Christmas party tomorrow!

Thursday, December 24, 2009

Countdown to Christmas Day 24: Charlotte Russe


Happy Christmas Eve! Today we spent time with my mom's side of the family. Since my family lives in KY and Randolph's family lives in SC it is not possible for us to spend every holiday with both of our families since we live in AL...the driving between these 3 states would be insane! So since we spent Thanksgiving with his family we are spending Christmas with my family. I wanted to do something special for Randolph since he wasn't going to see his family for Christmas and that was to make him one of the traditional desserts his family has every year...Charlotte Russe. His grandmother, Gana who just passed away in October, always made this dessert for his family every year at Christmas. This way he could be reminded of his family and I would be able to share a new dessert with my family that they had never had before since this is a southern dessert. Randolph has been enjoying this dessert on his mom's side of the family for as long as he can remember. I was able to taste it for the first time about 4 years ago when we spent Christmas with his family and it was really good!


The dessert starts off with some lady fingers....


Then it gets topped off with this gelatin, egg, sugar and whipping cream mixture.


Assembly of the Charlotte Russe...lady fingers + creamy mixture + cherry = YUM!


Garnish with some homemade whipped cream and a cherry on top!


Randolph trying a bite of my first attempt at making Charlotte Russe! I think I passed the test, it tasted really yummy and all of my family members really enjoyed it too!

Charlotte Russe

Ingredients

3 cups milk
1 quart whipping cream
4 egg yolks
4 egg whites
10 tablespoons sugar
pinch salt
4 tbsp gelatin
1/2 cup cold water
1 tablespoon vanilla
lady fingers

  • Soften the gelatin in a bowl with the water.
  • Bring the milk to a boil.
  • Combine egg yolks, sugar, salt and softened gelatin in a bowl. Pour milk overtop of mixture and stir like crazy (in the words of Randolph's Uncle Ted).
  • Strain the mixture and cool.
  • Beat egg whites until stiff and add to custard mixture.
  • Beat whipping cream until stiff and fold into custard mixture.
  • Place creamy mixture into fridge to chill for several hours.
  • To serve, place a few lady fingers in a bowl, place a dollop of the cream mixture on top and then add a cherry!
  • Makes enough for about 15 servings!
ENJOY!

Wednesday, December 23, 2009

Countdown to Christmas Day 23: Sour Cream Cake


Happy Dec 23rd! I just arrived back home in KY only a few hours ago for Christmas and have already accomplished so many things in such a short amount of time, one of which included baking this oh so yummy Sour Cream Cake! But before I baked this cake, I visited my friend Andrea and her newborn baby Drew, went to the Hofbrahaus which is a German beer garden so my husband could get some beer...this is his absolute favorite place in KY, then off to the Montgomery Inn Boathouse on the Ohio River in Cincinnati for a plate full of the best BBQ ribs for dinner! Then it was time to get down and dirty and get this cake made! This is one of my absolute favorite cakes because it is so moist yet the bottom of the cake has a crispy yet gooeyness to the crust...that is the BEST part! Today's baking adventure was fun because I got to bake with my mom in her kitchen! Well I guess she ended up doing most of the mixing of the ingredients with her hand held mixer...I'm a wimp when it comes to mixing by hand because I have a KitchenAid Standmixer that does all the hard work for me!


Here's a picture of me and my mom! She is mixing away and I'm sitting back relaxing!


Great job mom...this cake batter looks pretty tasty!


Sour cream cake is ready to enter oven in greased and floured bundt pan.


The cake is done! Look at how nice and fluffy the bottom of the cake baked up! This is my favorite part I was telling you about. Just look at the golden brown crispy edges that are cracked with the ooey gooey center peaking through. I can't wait to sink my teeth into a piece of this! Too bad I'll have to wait until tomorrow night...this cake is going with us to my grandparents house for Christmas Eve! This cake is a traditional dessert every year and I always have to eat at least two pieces, I just can't help myself!


Once the cake has cooled in pan for a few minutes, invert onto serving plate.


Sour Cream Cake

Ingredients

3 cups flour
3 cups sugar
6 eggs beaten separately
1/4 teaspoon baking soda
1 cup butter, softened
1/2 pint sour cream

  • Cream butter until soft, add sugar gradually.
  • Add egg yolks one at a time, beating after each one is added.
  • Add sour cream, flour and baking soda.
  • Beat egg whites until stiff, then fold into dough with spatula.
  • Grease and flour 10-inch bundt pan. Pour dough in pan.
  • Bake at 350 degrees for 1 hour 15 minutes.
  • Let cake sit in pan for 10 minutes, then remove to wire rack to cool.
ENJOY!

Tuesday, December 22, 2009

Countdown to Christmas Day 22: Sparkling Fruit Punch


Happy Dec 23rd! Only 3 more days until Christmas! This is going to be the simpliest recipe yet! I didn't have time to bake today because I worked a half day and now I'm making last minute preparations to get on the road to start my 725 mile journey to KY within the next few hours! But before I head out I wanted to be sure and leave you all with a fun, festive and super easy holiday drink! Sparkling Fruit Punch is such a fun way to celebrate the holiday with friends and family. This is a kid friendly drink too because it uses sparkling grape juice. But for those of you that want some alcohol you could substitute some champagne instead!


You only need three things...sprarkling grape juice, Cran Pomegranate juice and OJ. How easy is that?


Any my favorite part, getting to pick out my festive red and pink polka dot champagne flutes out of my china cabinet that only come out on special occassions! I think this calls for a celebration! CHEERS!

Sprakling Fruit Punch

Welch's Sparkling White Grape Juice (or substitute champagne)
Ocean Spray Cran Pomegranate Juice
Tropicana Orange Juice

  • Buy one container of each type of juice at the store.
  • To make punch, combine equal parts of sparkling grape juice and cran pomegranate juice.
  • Add a splash of orange juice.

ENJOY!


Monday, December 21, 2009

Countdown to Christmas Day 21: Decorated Sugar Cookies


Happy Dec 21st! Today it's all about the decorated sugar cookies! I mean it isn't Christmas without getting to custom make some homemade sugar cookies with any decorations you desire...frosting, sprinkles, sugar crystals, all different kinds of shapes...the possibilities go on and on. When I decorate sugar cookies it reminds me of the movie Prancer. I used to watch this growing up and I have actually seen it already this month as well. Do you remember the scene in the movie where the little girl, Jessica lays out a trail of sugar cookies for Prancer to follow so she can get him in the shed to hide from her father. The sugar cookies are decorated with sprinkles and just glisten in the snow covered ground...that is one of my favorite parts of the whole movie, because those cookies just look so yummy!


So lets get started and make some sugar cookies...shall we? First you prepare the dough and roll it out. Now comes the fun part, cutting out the cookie shapes. I had a variety of snowflake and tree patterns.


Look at all these naked sugar cookies. I think they need some icing and sprinkles don't you?


Ta da! Cookies galore! All decorated in festive reds and greens and multi colored sprinkles and icings! My sister and her husband are going to love me for this one! They special requested that I bring home some sugar cookies for Christmas. I think they will be quite pleased with the variety they will have to choose from!


I used the Roll-Out Sugar Cookie recipe from Wilton.


So this is the end of the cookies I made at my house today....but wait there is more! Oh yes, I went to another sugar cookie decorating party tonight too. Check out the photos below!


We had a Coach's Cookie Decorating party for all the Team in Training marathon coaches tonight that was organized by our TNT staff member! How fun is this!


We decorated gingerbread, stockings, stars, trees, cupcakes...and there were even some custom cookies made with secret goodies concealed inside like M&M's, marshmallows and mints. Let's just say some were getting a little inventive with their cookie decorating skills. Check out these male and female gingerbread wearing bikinis!


Coach Katie and Coach Kelly...the decorating divas. Katie's hands were turning green from all the icing! Coach Kelly was the one coming up with all the crazy cookie shapes and hidden secrets inside!


Not only did we decorate cookies but we wrapped presents for a 5 year old little boy who is going through treatments for leukemia right now and for his siblings as well. That is Molly, our TNT staff person and Coach Paul in the picture above! What a great way to celebrate the season with close friends making cookies and helping out a family in need! I just love all my Team in Training friends!

Sunday, December 20, 2009

Countdown to Christmas Day 20: Buckeye Balls


Happy Dec 20th! Only 5 more days until Christmas, and 2 more days until I start my road trip to KY to see my family for the holidays! Since I am heading north, and will be just outside of Ohio, which is the Buckeye state, I wanted to be sure I made one of my family's favorite candies...Buckeye Balls! Peanut Butter & confectioners sugar dipped in chocolate, what could be better than that? This is one super RICH candy but you can't just eat one...I find myself popping them in my mouth, one after another.


First you make the peanut butter and sugar mixture. Then you roll them into balls and place on a cookie sheet to chill.


Insert a toothpick into peanut butter balls so they are easy to dip in chocolate.


Melt chocolate and start dipping in chocolate coating.


You only want to dip the peanut butter balls about 3/4 of the way in the chocolate because they are suppose to look like actual buckeyes, which is the state tree in Ohio.


After you dip the balls in the candy coating chill in the fridge to allow the chocolate to set. Remove the toothpicks and smooth over the holes.


Buckeye Balls (recipe from Jif Peanut Butter website)

Ingredients
1 1/2 cups Jif Creamy Peanut Butter
1/2 cup butter or margarine, softened
1 teaspoon vanilla
1/2 teaspoon salt
3 to 4 cups confectioners sugar

Coating
1 pound chocolate flavor candy coating
2 tablespoons Crisco Shortening

  • Combine Jif, butter or margarine, vanilla and salt in large bowl. Beat at low speed of electric mixer until blended.
  • Add 2 cups sugar. Beat until blended.
  • Continue adding 1/2 cup sugar at a time until mixture shaped into ball will hold onto toothpick.
  • Shape into 3/4 inch balls. Place on tray. Chill.
  • For coating, combine candy coating and Crisco Shortening in microwave-safe bowl.
  • Microwave at 50% (medium) for 30 seconds. Stir. Repeat until mixture is smooth.
  • Insert toothpick in candy ball. Dip three-fourths of ball into melted coating.
  • Scrape off excess.
  • Place on waxed paper lined tray.
  • Remove toothpick. Smooth over holes.
  • Refrigerate until coating is firm then remove from paper.
  • Store at room temperature in covered container.
  • Makes 8 dozen.
ENJOY!
Related Posts with Thumbnails