Showing posts with label sugar cookies. Show all posts

Monday, March 4, 2013

Cora's 1st Birthday


I recently had the opportunity to help with the sweets for my friend Jennifer's little girls' 1st birthday party! Miss Cora sure is one special little girl, and also Sam's girlfriend so I wanted to go all out for her party!  Jennifer had the vision to decorate with shades of light and dark pink and lime green with both polka dot and stripe patterns. She coordinated all the party decorations and together we brainstormed on the sweets for the dessert table. We decided on cake balls, cookies and cupcakes, and of course a smash cake for Cora. I tried to carry the polka dot theme through the sweets as much as possible using pink and white polka dot cupcake wrappers, white cake balls with pink sprinkles, and #1 cookies with pale pink polka dots. We used some lime green polka dot wrapping paper as the table runner to balance out all the pink and add an extra pop of color to the table. Jennifer came up with the theme "year of firsts" from the invitation she chose so I used this idea to create a few special cupcakes with toppers displaying some of Cora's memorable "firsts". Jennifer really did an amazing job with all the party details and I was so honored to be able to help in the sweets department! Hope you enjoy the pictures from this sweet pink 1st birthday party! 

Just wait until you see Cora and her smash cake...not so sure she is a huge fan of icing just yet!


Wednesday, February 6, 2013

Mardi Gras - Mask Cookies


I'm back again with another fun way to celebrate Mardi Gras...mask cookies! You may remember I made some mask cookies a few years ago. Back then I didn't have a mask cookie cutter so I found clip art online and hand traced all my cookies...boy was that a lot of work! This year since I'm planning Sam's 1st birthday and mustaches & ties are the theme I just so happen to have a mask cookie cutter because, well the mustache flipped around makes a mask! It's two for one, gotta love that!


So whip up a batch of masks using your favorite sugar cookie & royal icing recipes. This is my go to recipe! Tint your royal icing green, yellow and purple.


Then pipe the outline of the masks and the shapes of the eyes.


Then grab some sprinkles and get ready to decorate!


Flood your cookies. I always work in groups of 6 cookies at a time when flooding. So after you flood 6 stop and add the sprinkles! Then flood 6 more, sprinkle, and repeat until your are done with all your cookies.


Time for sprinkles, give a generous coating! This is one of my favorite and quickest ways to decorate cookies. You can hide any flaws from your flooding and you don't have to wait for the flooding to dry before you pipe on decorations! And as an extra bonus I love the crunch you get when you bite into a sprinkle covered cookie!

Tip: Allow your flooded & sprinkled cookies to dry for several hours. Then tip the cookie sideways and allow the extra sprinkles to fall off. Any sprinkles that get stuck inside the mask eye holes you can easily remove by gently scraping a toothpick in between.


Look at how they sparkle! I packaged these up this weekend and delivered to some of our friends with kids! They absolutely went crazy over them! I've got one more Mardi Gras recipe coming up on Friday! I've saved the best and yummiest for last so you won't want to miss it! Any guesses what it could be?

Thursday, November 22, 2012

Pumpkin Cookies

Wishing you all a Happy Thanksgiving and a wonderful day with the ones you love! It's been an amazing year as we were blessed with our little boy Sam and I can't even imagine my life without him. He brings us so much joy, happiness and laughter each day! I can't believe he is already 8 months old! We are so thankful to have him in our lives! I recently made these pumpkin cookies as a "thank you" to Sam's daycare workers. They take such great care of him while we work and I wanted to show them our appreciation with a little fall treat! This time of year you can't go wrong with anything pumpkin as far as I'm concerned so I thought pumpkin cookies would be super cute to show our appreciation.


I also packaged up some cookies and took them to the post office! I am a frequent visitor to our local post office and so from time to time I like to say thank you in the form of sweets! They are always so excited and appreciative when I bring them in some cake pops or cookies.


So on this day let's all remember to "slow down" (I know this is extremely hard for me) and spend time with family and remember to say "thanks" and be appreciate for all of the blessings in our life!

Happy Thanksgiving to you all!

Wednesday, November 14, 2012

Cake Inspired Birthday Cookies


Today's post is dedicated to my amazing sister Emily! It's her birthday today and I wanted to make her some "cake inspired" cookies to show her how much I love and appreciate her! This past year she became an aunt or "Auntie Em" as we now call her to our little boy Sam! Let's just say we are so blessed to have her in our lives and Sam is one lucky little boy to have her as an aunt! I am not kidding when I say probably about 90% of his wardrobe for the first almost 8 months of his life has been bought for him by her! Emily is constantly sending me text messages during her lunch break of new outfits she has bought for Sam! And if she comes across one that has something to do with "aunt" on the front, well of course she is putting it in her shopping cart! So today, although we are 725 miles apart, I wanted to send her some birthday love in the form of cookies! Lucky for her, my mom (our mom) is down here visiting us right now and flying home today to hand deliver these special cookies!

The theme for these cookies came to me from our numerous conversations we have had about cakes we come across online from other bloggers that we absolutely love and that she always tells me, "you should try this sometime"! The common themes for most cakes that grab our attention these days consist of ruffles, ombre, or sprinkles! So what better way to celebrate the birthday girl than with some of her favorite cake trends replicated on cookies!


So first up is the "ruffle" cookie and "ombre"! If you are a long time follower of my blog you may remember my Valentine's ombre cupcakes here, with the recipe and tutorial posted on Half Baked here. Using a decorating tip #104 and varying shades of turquoise I created these ombre ruffle cookies! I used a crusting buttercream icing instead of royal icing for these cookies so that I could get the texture I wanted when creating the ruffles.


Every birthday needs sprinkles am I right? Rainbow non pareils are my absolute favorite! I love the crunch you get when you bite into the cookie! I think my sister is pretty fond of rainbow sprinkles too. Afterall, here is what she requested for her birthday two years ago! Today she is celebrating the big "29"! Enjoy the last year in your 20s Emily!


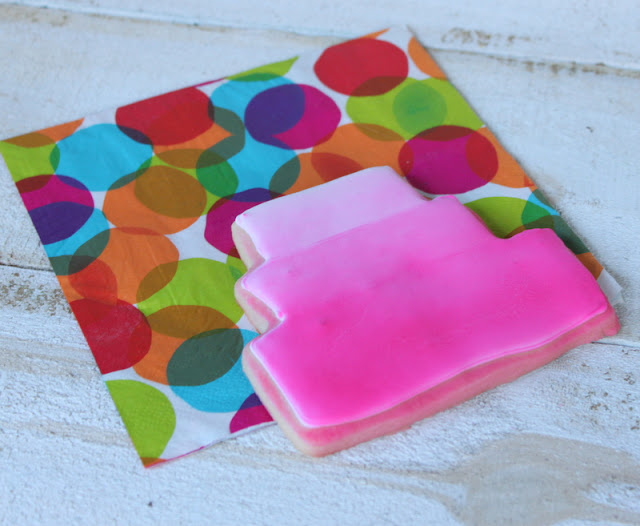
And finally another "ombre" cookie using a technique I have been dying to try ever since spotting these cookies on The Sweet Adventures of Sugarbelle. All you need is a can of Wilton Color Mist and a piece of paper to spray the cookies in varying shades! Let's just say this took a little trial and error at first to get a feel for the spray can, but I finally got the technique down! Still need more practice though! Step-by-step photos are over on The Sweet Adventures of Sugarbelle so check it out!


I think these cake inspired birthday cookies turned out pretty cute and I can't wait for her to see them in person! I have also already taste tested them, and they are pretty yummy!

Happy Birthday Auntie Em! Hope you have a great day and enjoy your cookies! We will see you next month for Christmas! Sam can't wait to give his auntie a big hug and kiss!

Sunday, October 28, 2012

Halloween Desserts

Halloween Desserts...need some ideas before Halloween on Wednesday, here's a peek at some cookies, cake pops, cupcakes and brownies I recently created for a party last weekend! I snapped a few behind the scenes shots as I was decorating the cookies and tombstones for the brownie graveyards! IHope you enjoy these Halloween treats!


I love how these brownie graveyards turned out! Thanks to my new Chicago Metallic Slice Solutions Brownie Pan, I was able to create uniform size brownies and didn't even have to cut them...the pan did all the work! Do you have one of these pans? If not I highly suggest getting one...add it to your Christmas list! Decorated with black fondant tombstones, a candy pumpkin and some green buttercream grass to complete the look.


Red Velvet Cupcakes with Cream Cheese Frosting


Strawberry Cupcakes with Strawberry Lemon Cream Cheese Frosting


Before I took the desserts to the customer, I set up a mini display in my back yard on the new Farm table my husband built for me! I came across this amazingly beautiful DIY Farm Table on the blog Our Vintage Home Love and immediately fell in love and said I need one of these for my dining room! I showed my husband the blog post with the instructions, gathered the list of supplies we needed and off to Lowe's we went. Within a few hours he had made this table! Lucky for us we had an old desk in our shed that we were able to use as the base, it just had to be painted white. So we bought the pine boards, wood stain and sanding paper for the top and probably spent less than $50 on this entire project! If you have never checked out Our Vintage Home Love before, it is an amazing site with a great story behind it and some awesome DIY inspiration! I think I seriously sat and clinked on every tab and just kept browsing and browsing for a few hours once I discovered their site! So know that you know a little about our table, let's get back to the sweet stuff!

Here's a few more pictures of all the finished Halloween treats! Hope you all have a fabulous Halloween!


Related Posts with Thumbnails