Thursday, February 25, 2010

Cupcake a Week: Samoa Minis


Well as most of you probably know, February is Girl Scout cookie month! I'm sure you've seen those cute little girls outside of the super markets this month selling these famous colorful boxes of cookies for their troops or have already bought one, two, three or more boxes from one of the girls in your neighborhood. I have been ordering girl scout cookies for as long as I can remember since my sister was involved in girl scouts as we were growing up. My favorites have always been the Red Box - Tagalongs (chocolate & peanut butter), the Green Box - Thin Mints and the Purple Box - Samoas (chocolate, coconut & caramel). So since we have already bought and eaten half way through several boxes of cookies this year, I thought it would be fun to try and recreate one of my favorite cookies as a cupcake!


So here goes my attempt at making a Samoa cupcake. The 3 most important ingredients: coconut, caramel and chocolate.


I had to steal this box away from my husband because he had already eaten 2 rows of the cookies in 2 days.


I love the 3 layers of oooey gooey goodness on this cookie. The caramel topped with the toasted coconut and then the drizzle of chocolate...these 3 flavors together are delicious! And when you bite into the cookie and the caramel stretches out into a thin string that hangs from your mouth, that makes your lips all sticky...you know what I'm talking about right...or I am just a slob when eating these cookies????


And the coating of chocolate on the bottom side of the cookie is a special treat too! I used to put these cookies on my finger as a kid and pretend that they were a ring...did anyone else do that too? So now that I've gushed about all the features that make me absolutely love this cookie, let's talk about how to turn the flavors found in this cookie into a cupcake!


I started going through all different types of cupcake recipes, looking for ones that had at least one of the key ingredients: coconut, caramel or chocolate in them. I decided I wanted to make pretty traditional flavored yellow cupcake but I substituted the granulated sugar with brown sugar to help bring out a caramel flavor in the cake. Once I had the base of the cupcake batter made I then melted some caramels and mixed in along with some coconut flakes to add some extra textures and layers of flavors in the cake.


While the cupcake were cooling, I toasted some more coconut in the oven that I used for a garnish on top.


I melted some more caramels and drizzled over the cupcakes.


Then sprinkled on the toasted coconut.


And we can't forget about the chocolate. Don't worry about making the garnishes look perfect like the cookie...I just wanted to drizzle them on quickly and roughly that way each cupcake is unique and some are more ooey gooey than others...those are the best!

So what do you think...have I made a pretty good Samoa cupcake cookie replica? Have I convinced you to go out and buy a box of these cookies or whip up a batch of these cupcakes! I promise you won't be disappointed with either one of them, they are both delish! These cupcakes baked up so fluffy and moist with little pockets of caramel tucked inside.


Samao Minis Cupcakes (makes 36 mini cupcakes)

Ingredients:
-1 1/2 sticks butter, softened
-1 1/4 cups light brown sugar
-3 eggs
-1 tsp vanilla extract
-2 1/2 cups all-purpose flour
-2 tsp baking soda
-1/4 tsp baking powder
-1/2 tsp salt
-3/4 cup milk
-1/2 cup coconut flakes
-6 Kraft caramels, melted with a splash of water
  • Preheat oven to 350 degrees and line mini cupcake tins with paper liners.
  • Combine butter and brown sugar in bowl of electric mixer and cream together on medium speed.
  • Add eggs, one at a time, beating well after each addition. Add vanilla and mix.
  • Combine the flour, baking soda, baking powder and salt in a bowl.
  • Add the flour mixture and milk to the creamed butter and sugar alternating the dry and wet ingredients in 3 batches.
  • Melt the caramels in the microwave in 30 second intervals, stirring in between until smooth. Pour melted caramel into the batter and stir.
  • Add the coconut and stir.
  • Divide batter evenly into prepared cupcake liners.
  • Bake for 14-16 minutes. Let cool before adding toppings.

Toppings:
-8 Kraft caramels, melted with a splash of water
-1/2 cup coconut flakes, toasted
-1/2 cup semi sweet chocolate chips, melted
  • Melt the caramels in the microwave in 30 second intervals, stirring in between until smooth. Drizzle melted caramel over the cupcakes.
  • Sprinkle toasted coconut over caramel topped cupcakes.
  • Melt the semi sweet chocolate chips in the microwave in 30 second intervals, stirring in between until smooth. Drizzle melted chocolate over the cupcakes.

If you have another Girl Scout cookie that is your favorite and you want me to recreate it as a cupcake leave me a comment and just maybe your cookie flavor will be featured as a cupcake in an upcoming post!

ENJOY!

Sunday, February 21, 2010

Fairytale Cake Competition


If you are a Food Network, specifically Cake Challenge and Ace of Cakes junkie like I am then you are definitely going to appreciate and enjoy this post! This weekend I had the opportunity to go to my first ever Cake Competition! No, I didn't compete in this competition myself...I think I need a little more experience first, but I did go to support one of my cake baking & decorating friends who entered a cake! The competition was in Pensacola, FL and was hosted by The Panhandle Cake CRUMBS. The theme for the competition was Fairytales and all levels of experience ranging from children, youth, novice, advanced and professional decorators could enter a cake.

My friend Evan entered a cake in the Professional division. She has been making and selling cakes for over a year now and she does some amazing work, so check out her blog Buttercakes. She has recently started working as a cake decorator at one of our local bakeries, The Pastry Shop. I will show you Evan's cake in just a few minutes...


As you entered into the competition this table of cakes was on display showcasing the the variety of styles and elements that can be obtained on cake using the new Cricut Cake. Basically if you are a scrapbooker and have used a Cricut before to cut out shapes and templates for your books, this is the same thing only for cake decorators....how cool is that? They had a lady demonstrating how to use the machine and selling instructional DVDs. They also had a raffle to give away the Cricut Cake and 4 DVDs valued at $600. So I bought some tickets and held my breath as they started the drawing. First of all they had white and blue tickets...I had a white ticket and that is the color that was pulled from the box...so I knew my chances were looking good...then they started to call the name of the winner..."Lar"...I was getting excited, it sounded like my name...but then all in a flash my dreams for the new Cricut Cake came crumbling down when the rest of the name was called "retta"..."Loretta" was the winner...not "Lauren"...darn I was so close to having a super fabulous cake decorating machine. I guess I'll have to save up to buy one on my own! Check out how super cute and detailed some of these cakes are that were made using the Cricut Cake templates.


I absolutely LOVE this animal themed cake. This would be perfect for a birthday party at the zoo!


And all of this intricate scroll work...wow!


Look how elegant and perfect this cake is!

Well after I ooeed and aaahhhed over the elaborate cakes then it was time to start scoping out the cakes for the competition. This is the cake that was the winner from last year. The Theme was "The Great Outdoors". This cake looked awesome in person, the picture doesn't do it justice.

Now let's move on to this years cakes and the different talent levels...

Here are the pictures of the Professional cakes:


And the WINNER is Shrek & Fiona! I just LOVE this cake and for oh so many reasons! I love how the cake has 2 distinct sides, one that tells the story of Shrek and the other of Fiona. The layering and the detail is just amazing! The color pallet is just perfect! This cake actually won 3 awards: winner in the Professional category, Best of Show and Decorator's Choice. WOW! I hope to be able to decorate a cake like this some day!


Here's a close up of the top of the cake...I mean check out all the details on the onions, flowers, leaves and scroll work. It is so clean and crisp, simply perfection.


This was my favorite side of the cake. I just love how elegant and simple it is with the different fondant techniques and embellishments. I think my favorite tier is the white ruffled layer with the green line of buttons. What an amazing cake!


This is the 2nd place winner in the Professional category...and it was done by the only male decorator to enter the competition. That fish looks so realistic and I love the colors.


And the 3rd place winner in the Professional category. This was one of the largest cakes and the fondant work is amazing creating all those basket weaves. Those oranges looked so real, like you could just grab one off and take a bite!

Now that you have seen the top 3 cake in the Professional category, here are the other entries:


Here is Evan with her cake, portraying the tale of Hansel and Gretel. I love the light green fondant color she chose and all of her attention to detail with the trees, crows and the characters. Here cake tells a story as you follow it around from one tier to the next.


According to the rules, Evan had to enter in the Professional division since she has sold her cakes for money before. She is still fairly new to the cake decorating industry though and feels like she probably would have done better entering in the Advanced competition instead just based on the skill levels of some of the other Professional cakes.


I still think she did an AMAZING job! Look at how intricate little Hansel and Gretel are.


And I love the technique she used for making trees by covering rods and wire in chocolate and then giving them texture with a tooth pick and then piping on every single leaf individually...now that takes some time and patience!


I loved this cake with the leaning affect...how does it even stand up is a mystery to me!

Now moving on to the Advanced category:


This was another one of my favorites, the Old Lady and the Shoe! I love all the colors and the boot sculpture with the scroll work and with the figures peaking out the winows.


Another favorite...Princess and the Pea. The rainbow colored bed was the centerpiece of the cake design.


Now moving on to the Novice category:

The 3 Little Pigs...so cute...I love the spaghetti and Chinese noodles representing the straw and hay...very clever!


Now here are some of the most adorable cakes you will ever see entered by children. It is so cool to see how they can portray some of their favorite fairytales through cake. Kids just have the greatest imagination.


Love the Little Mermaid in the clam shell with that long red hair.


Another take on the Little Mermaid...this cake was done by a little boy...I think he even got 3rd place! Maybe we have a future Duff Goldman from Ace of Cakes here, what do you think?


Look how cute this Cinderella cake is. I even got to meet the little girl who decorated this cake and she was so excited when I told her I liked her cake!


WOW! What a fun day of CAKES of all shapes, sizes, colors and decorations from all ages! I think next year I may just have to think about entering the competition myself. Are you ready for next years theme...drum roll please.....The 60's! Evan has already started doing some research on ideas she is thinking about for her cake next year...I can't wait to see what she comes up with. She sent me a long list of all kinds of events, tv shows, books, music, toys that were popular in the 60's and immediately I had an idea pop in my head that involved some of the tv shows I remember watching as a kid...the Jetsons, Flinstons and Alvin and the Chipmunks...how fun would it be to incorporate all of those characters into one large cake!

Doesn't this post just make you want to go decorate a cake now? Well, luckily for me, I'll be getting some practice coming up starting in March. I have signed up for Wilton's Fondant and Gum paste class so stay tuned and I'm sure you will get to see my next adventures in cake decorating real soon!

Happy Decorating!

Friday, February 19, 2010

Cupcake a Week: Caramel Mud Cakes with Powdered Sugar


Happy Friday & Happy Weekend! Boy the month of February seems like it is just flying right on by! After baking all kinds of treats last week for Valentine's Day my kitchen is still overflowing with lots of left overs. I have seriously been eating sugar cookies, cupcakes, ice cream cake & king cake after breakfast, lunch and dinner all this week! Can we say SUGAR OVERDOSE! But to keep the goal of making a "cupcake a week" that I set for myself at the beginning of 2010 I am going to continue to indulge in the sugary goodness for yet another day and introduce to you the Caramel Mud Cupcake.


When trying to figure out what flavor cupcake to make this week, I wanted to steer clear from all of the sweet flavors I have been eating recently and give my taste buds something different to look forward too. Plus I wanted to find a recipe that was quick, low maintenance, something I already had all the ingredients for and one that didn't make 2 dozen cupcakes. I came across the recipe for the Caramel Mud Cupcakes in the book called Cupcakes by Pamela Clark. This book has so many non-traditional cupcake flavors and unique decorating ideas.


Caramel Mud Cupcakes (makes 12)


Ingredients:

-1 stick butter, chopped coarsely
-3 1/2 ounces white chocolate, chopped coarsely
-2/3 cup firmly packed brown sugar
-1/4 cup honey
-2/3 cup milk
-1 cup all-purpose flour
-1/3 cup self-rising flour
-1 egg

  • Preheat oven to 325 degrees. Line 12-hole standard muffin pan with paper baking cups.
  • Combine butter, chocolate, sugar, honey and milk in small pot; stir over low heat, until smooth. Transfer mixture to a medium bowl; cool 15 minutes.
  • Whisk sifted flours into chocolate mixture, then egg. Divide among baking cups.
  • Bake 25-30 minutes. Turn cakes onto wire race to cool.
  • Sift powdered sugar over top of cupcakes.

ENJOY!

Tuesday, February 16, 2010

Happy Mardi Gras! - King Cake


Happy Mardi Gras! The Carnival Season has been in full swing here in Mobile for the last couple of weeks and today is the conclusion of all of the festivities with Fat Tuesday and parades all day long! One of the traditions of Mardi Gras is the King Cake. This is simply a ring of cake topped with icing and colored sugars of purple, green and gold. The purple represents the passion of Christ, the green represents hope and the gold the rewards of leading a Christian life. Some cakes even have fillings of cream cheese, fruits or praline. My absolute favorite is the praline filling of cinnamon, brown sugar and pecans!

King Cakes have been in absolutely every grocery store and bakery here in Mobile for the last several weeks, and they are all made slightly different...some with lots and lots of icing and sprinkles (this is my favorite), some with minimal icing and sprinkles and some with no icing and only sugar sprinkles! I say the more SUGAR the better when it comes to King Cake! In past years I have been able to devour pretty much an entire King Cake by myself in about 2 days, and when it was gone I would go get another one, and another one, and another one...throughout the entire Mardi Gras season. They are such a special treat that only come around for a few weeks out of the year, so I have to indulge while I can.

This year I am currently only on my 3rd King Cake...I've been trying to control myself! We got the first one from Winn Dixie and it was filled with apples. I had never tried one with apple filling before but it was GOOD! The 2nd cake I made from scratch...which is what you see in this blog post. The 3rd one my husband picked up today from Atlanta Bread Company and it has a cream cheese filling, also very tasty!

So now that you know a little history of the King Cake, I'll show you step-by-step how to make your very own! First you make the dough and let it rise and then refrigerate over night.


Then roll out the dough flat to prepare it for the filling.


Fill dough with praline filling down the center and then fold over.


Once the dough is folded over, then roll it up tightly keeping the seam side down.


Turn the roll into a circle and seal it closed and place on a baking sheet. Then allow cake to rise again until doubles in size.


Bake cake until gold brown and allow to cool.


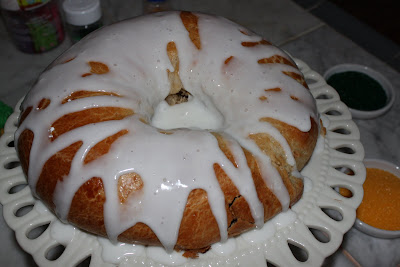
Drizzle cake with icing.


Sprinkle with purple, green and gold sugar sprinkles.


Now you have one fancy sparkly King Cake!


Don't forget about those Mardi Gras beads...this makes a perfect decorative touch around the King Cake display!

King Cake (recipe adapted from www.nolacuisine.com)

For the Brioche:
-1 envelope Active Dry Yeast
-2 Tbsp Warm Water (115 degrees F)
-1 tsp iodized salt
-2 Tbsp granulated sugar
-1/4 cup milk
-2 cups all-purpose flour, sifted
-1 tsp cinnamon
-2 eggs, beaten
-1 1/4 sticks cold unsalted butter, cut into very small dice
-1 egg beaten and 2 Tbsp water, for the eggwash
-1 plastic baby trinkett

  • Dissolve the yeast in the bowl of a stand mixer fitted with the dough hook attachment. let stand until frothy.
  • Dissolve the salt, sugar and milk in a small bowl. When dissolved combine the milk mixture with the yeast mixture. Mix the cinnamon with the flour.
  • With the mixer on low speed, add teh eggs, then gradually add the flour, until all is incorporated. Knead on low speed for 10 minutes, or until a smooth elastic dough is formed. A little more flour may be necessary. With the motor running, incorporate the butter into the dough, a little at a time but rather quickly so that it doesn't heat up and melt.
  • Turn the dough into an oiled bowl, loosely cover with plastic wrap and let rise for 1 hour in a warm spot.
  • When the dough has doubled in bulk punch it down, cover and place in the refrigerator overnight.
For the Pecan Filling:
-1 cup pecan halves
-2/3 cup brown sugar
-1 tsp vanilla extract
-1 tsp cinnamon
-1 pinch of salt
  • Combine all of the ingredients together.
  • Preheat the oven to 350 degrees.
  • Roll the dough out to a 6 x 18 rectangle. Spread the pecan filling out in the middle of the rectangle along the whole length, leaving about 1 1/2 inch on each side. Place the baby trinket somewhere with the filling. Fold the length of the dough over the filling and roll up tightly, leaving the seam side down. Turn the roll into a circle, seam side down and put one end inside the other to hide the seam, and seal the circle. Place the cake on a baking sheet and let rise, loosely covered with plastic wrap for 45 minutes or until doubled in bulk.
  • Brush all over with the egg wash, then place the king cake into the oven and bake for 30 minutes or until golden brown.
  • When the cake cools, brush with some of the glaze (recipe below). Sprinkle cake with colored purple, green and gold sugars.
Glaze:
-1 cup powdered sugar
-milk, enough to make an icing that can be drizzled

The meaning behind the baby trinket is that the person who finds it hidden in their piece of cake is the one who has to bring the King Cake to the next party. If you like King Cake as much as I do, let me know where your favorite place to eat a King Cake from is!

Happy Mardi Gras!

Related Posts with Thumbnails