Wednesday, July 27, 2011

Homemade Vanilla Bean Ice Cream

I couldn't let summer fly by, much less the month of July (National Ice Cream Month!) without posting at least one homemade ice cream recipe! Afterall, I am an ice cream junkie and most nights during June, July and August I can be seen with a bowl of ice cream lathered in chocolate and caramel sauce stuffing my face! Typically my favorite ice cream flavors include chocolate in some form...chocolate chip or cookies n' cream, but today it's all about good ole vanilla! Let me tell you, this Vanilla Bean Ice Cream recipe is pretty much the most delicious batch of ice cream I have ever tried. Good bye store bought ice cream, hello homemade for the rest of the summer!

I was first inspired to make homemade ice cream while on a 5:00AM trip to Walmart a few weeks ago when I spotted these fun little gems...mini wafer bites with white chocolate and rainbow jimmies. Why you ask was I at Walmart so stinking early? Well it was to get some surprise birthday goodies for a running friend before our 6:00AM run that morning. These wafers caught my eye while I was in the bakery section looking for some store bought cupcakes (I am ashamed to admit this giving my love for homemade cupcakes...but time just ran out for me to whip up a batch from scratch). Please forgive me for buying store bought cupcakes...but hey something good did come of it right...the idea for this homemade ice cream!


Vanilla Bean Ice Cream (adapted from David Lebovitz, The Perfect Scoop)

Makes 1 quart

Ingredients:
-1 cup whole milk
-pinch of salt
-3/4 cup sugar
-1 Tbsp vanilla bean paste
-1 cup heavy cream
-1 cup half and half
-7 large egg yolks
-1 tsp pure vanilla extract

1.Heat milk, salt and sugar in saucepan. Add the vanilla bean paste into the milk. Cover, remove from heat and infuse for one hour.
2.To make the ice cream, create an ice bath by placing a 2-quart bowl inside of a large bowl that has been filled with ice and water. Place a strainer over top of the smaller bowl and pour the cream into the bowl.
3.In a separate bowl, stir together the egg yolks. Rewarm the milk and gradually pour some of the milk into the yolks, whisking constantly as you pour to temper the mixture so the eggs don't scramble. Pour the warmed yolks and milk back into the saucepan.
4.Cook over low heat, stirring constantly and scraping the bottom with a heat-resistant spatula, until the custard thickens enough to coat the spatula.
5.Strain the custard into the heavy cream. Stir over the ice bath until cool. Add the vanilla extract, then refrigerate to chill thoroughly. I kept refrigerated overnight.
6.Remove the custard from the refrigerator and freeze in your ice cream maker according to the manufacturer's instructions. I have this Cuisinart ice cream maker and mixed the custard for 25 minutes.
7.Ice cream will be soft and should be eaten immediately or placed in an airtight container in the freezer to firm up for a few hours or even overnight.

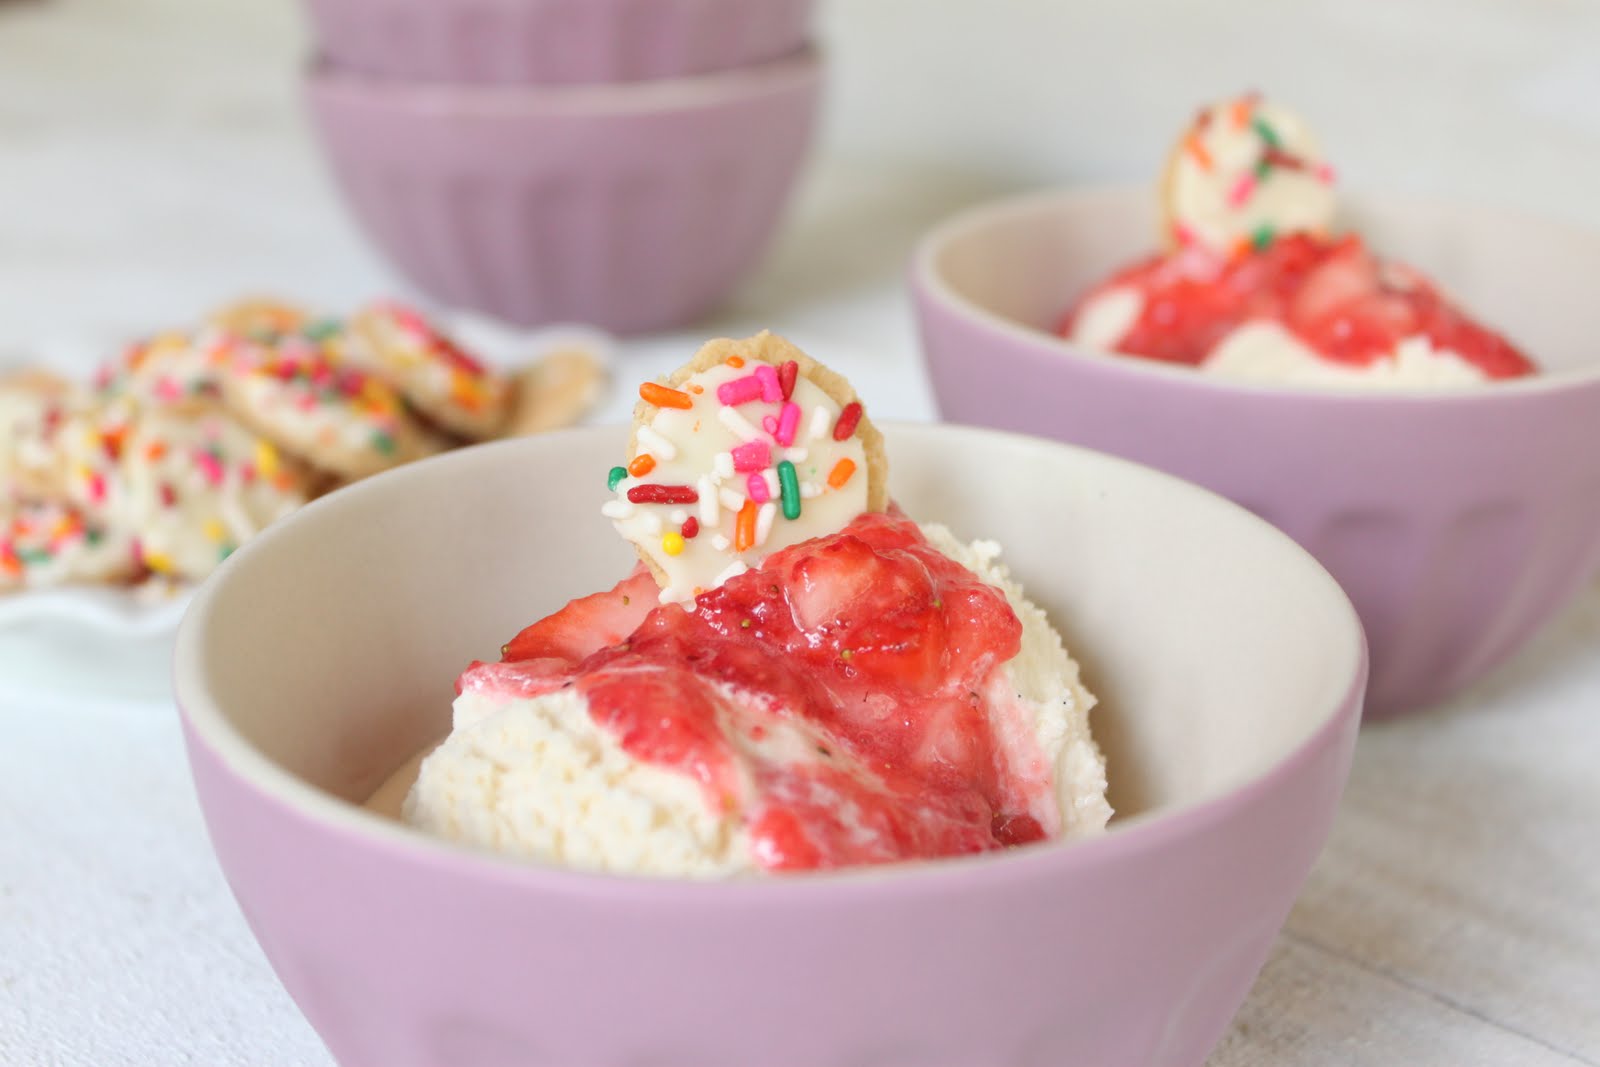
If you desire add some of your favorite toppings to your ice cream. I added some fresh pureed strawberries on top and it was delish!

Promise me you will make this vanilla bean ice cream before summer is over! It is rich, creamy and I love the little black specs of vanilla bean throughout! It was soooo good, I actually made 2 batches! Check back soon because I have a great way to take this ice cream recipe one step further and turn it into a fabulous ice cream cake you are gonna love!

Sunday, July 24, 2011

White Wedding Dessert Table


This past weekend two of my great friends Katie & Derek got married! I was honored when Katie asked me to create a dessert table for her special day. Her vision was to have a small cake, cupcakes and sugar cookies. She wanted to keep things clean and simple, with white being the focal color and a hint of green to accent. I love the Save the Date invites they sent out with the bicycle built for two! Katie and Derek first met a few years ago while training for a triathlon, so this announcement was so fitting for their special occasion.

Keeping with the white theme, I decorated sugar cookies using 3 types of white sprinkles: nonpareils, sugar crystals and pearls.

To add a touch of green I made some "mr. & mrs." cookies especially for the bride and groom.

Of course I had to create a few bicycle cookies to match their Save the Date!

Here are a few other special cookies I made only for the bride and groom so they could enjoy while honeymooning.


Katie's wanted to have a small cake for them to cut, inspired by i am baker's rose cake. I had so much fine trying this decorating technique using tip 1M.

The inside of the cake was yellow with chocolate icing in between the layers...the bride's favorite!

To match the cake, all the cupcakes were decorated with a rose on top. The cupcakes were all carrot cake.

Here's how everything came together on the dessert table. The bride's grandmother also made her signature almond pound cakes with a family recipe. And hiding under the dessert table are all the extra cupcakes and cookies to be refilled throughout the reception!


I just loved Katie's expression when she first saw the dessert table! I am thrilled that she was so happy with how everything turned out!

The look we were going for was similar to Amy Atlas' signature white dessert table.


Time to cut the cake...


Congratulations Katie & Derek! I wish you a lifetime of happiness! Thanks for asking me to be part of your special day!

Sunday, July 17, 2011

Sugar BakeShop - Charleston, SC

Randolph and I recently took a trip to Charleston, SC to celebrate our 5 year anniversary! Sadly after 4 days the trip had to come to an end but not before stopping by a local cupcake shop! Of course I did my research before leaving home and knew that Sugar Bakeshop was on the list of "to do's" while in Charleston. Located on Canon street in downtown, this is the sweet and charming little shop we pulled up to and I immediately jumped out of the car like a little kid anxious to go inside to cupcake heaven!

And of course I had to get a picture in front of the shop! You could say I'm a little obsessed with cupcake shops, or maybe you already knew that from this, this and this post.


Love the mural of the blueberry topped cupcakes on the side of their building! And how cute is this little popsicle cart?

As you walk inside you are greeted with cake pedestals filled with all their cupcake varieties. YUM! There were lots of delicious flavors to choose from but I finally was able to narrow it down to three.

I of course had to sample a red velvet cupcake. This is just one of my must try flavors anytime I check out a new cupcake shop. And I must say it didn't disappoint!

I loved this little rack with vintage accessories and rolls of bakers twine, and the unfinished wall texture was super cool too! What a charming shop!

Lots of bakery boxes with Sugar's logo on them! Love the name and the color!

More cupcakes and even jars of cookies! I want that green pedestal!

Love the simplicity of the chalkboard featuring their daily flavors.

I am missing this shop already. Maybe I can talk Randolph into going back again sometime soon!

Ahh yum, their vanilla bean cupcake with sugared blueberries on top! You bet I had one of these and it was AMAZING! I can't wait to make my own cupcakes with sugared berries now!


My 3 cupcakes boxed and ready to go! Randolph got a lemon curd cupcake and devoured it before we could even leave the store! I stole a bite of his too, and it was delish!


Red Velvet w/ Cream Cheese...Chocolate w/ Chocolate...Vanilla w/ Vanilla & Sugared Blueberries

I took my cupcakes to go because we had just eaten lunch at Groucho's (I highly recommend the Apollo Dipper with the Formula 45 sauce) one of our favorite Charleston sandwich shops and I thought I was too full to eat dessert. Well five minutes down the road and all 3 of these babies were half way gone...I knew I still had some room for Sugar! Thank you Sugar Bakeshop for making my trip to Charleston sweet! I will definitely be back again some day!

Monday, July 11, 2011

Strawberry Lemonade Cupcakes in a Jar


Well its officially summer and oh so very hot here in Mobile, AL! I don't know about you, but on a steamy summer afternoon nothing tastes better to me than a fresh squeezed glass of lemonade! With my fruit basket overflowing with lemons I decided why not turn my favorite summer drink into a cupcake.

Now you can drink your lemonade and eat it too. So head on over to Half Baked and check out my recipe for Strawberry Lemonade Cupcakes.


Saturday, July 9, 2011

Artwalk Interactive Rainbow Cake & Cupcakes

I have been wanting to make a rainbow cake for a while now, and this week I finally had the opportunity to play with red, orange, yellow, green, blue and purple cake batter!

I made a 6" round 6-layer cake...


And 100 ROYGBP cupcakes. I LOVE these VIBRANT colors!

Each cupcake was topped with a white fondant circle to be decorated as part of an artwalk celebration. The idea for a "decorate your own" cake & cupcakes came from the talented Rosie of Sweetapolita.

Here is the final display I designed for the 6th annual LoDa Artwalk. The cake and cupcakes were displayed at wellbornIdeas as part of an "interactive" display.

People who visited the gallery were invited to grab an edible marker and decorate their "blank canvas" on top of their cupcake.

Here's a look at the final 3 tier cake prior to being decorated by local artists as well as members of the community. The bottom two tiers are dummy cakes and the top tier is the ROYGBP cake! To play off of the scalloped edge of the cake pedestal I thought it would be fun to create a scallop rim around each tier of cake in the rainbow colors to tie in with the theme.

Here's a look at 3 wellbornIdeas employees decorating their cupcakes.


The wellbornIdeas logo on a cupcake...


and on the cake


Here is Ashley, one of the featured gallery artists for the evening putting her artistic talents to work on the bottom tier of the cake...looking good!

I love how she used the scallops and turned them in to owl eyes, I would have never thought of that...so creative!

It was so cool to see a variety of creative minds coming together with their artistic contributions to the final cake!

Even the little ones got in on the fun!

Here's the final cake! What an amazing event to be a part of! Thanks wellbornIdeas for asking me to provide the cake and cupcakes for this special event!

To see more pictures you can head to my facebook page.
Related Posts with Thumbnails