Showing posts with label peppermint. Show all posts

Thursday, December 27, 2012

Peppermint Ice Cream & Chocolate Dipped Crushed Candy Cane Cones


What do you do with all those left over candy canes now that Christmas is over? Make Peppermint Ice Cream and Chocolate Dipped Crushed Candy Cane Ice Cream Cones!

This recipe is truly the easiest no fuss ice cream recipe I have ever come across and you don't even need an ice cream maker! Why is it so simple? It only involves 2 Ingredients! I know it sounds crazy, but it is absolutely true and perfectly delicious! I have seen "2 Ingredient Ice Cream" on several blogs before and it's been on my "to try" list for some time now. Well with an abundance of candy canes left over from Christmas I thought peppermint ice cream would be the perfect cool treat since I've done my fair share of eating cookies and cakes these last few days! And since you can't have ice cream without a cone, well of course a chocolate dipped cone with crushed candy canes is a necessity!


So grab some chocolate and melt it in a bowl. Dip the top of each cone in the melted chocolate.


Sprinkle crushed candy canes on top of each chocolate dipped cone.


Simple. Festive. Delicious.


I'm thinking white chocolate dipped cones would also be equally amazing!


Now that the cones are made, let's focus on the ice cream. All you need is 2 ingredients: heavy cream + sweetened condensed milk. Beat the heavy cream until stiff and then fold in the condensed milk. Stir in your favorite toppings - crushed candy canes & peppermint extract is what I used. Freeze for 6 hours. It really can't get any easier than this and honestly still tastes rich and creamy like any ice cream you would find at the store or from your favorite ice cream shop!


Scoop ice cream into a bowl and sprinkle with more crushed candy canes!
 

Or serve with a chocolate dipped cone!

2 Ingredient Peppermint Ice Cream
(inspired by Eagle Brand)

2 cups heavy cream
1 (14 oz) can sweetened condensed milk
20 crushed mini candy canes
1/2 tsp peppermint extract

1. Place heavy cream in bowl of stand mixer. Using whisk attachment beat on high for about 1-2 minutes until stiff.
2. Fold in sweetened condensed milk.
3. Add in crushed candy canes and peppermint extract. (Or any other mix-ins you prefer)
4. Place ice cream in a plastic container with a lid and freeze for 6 hours.

Chocolate Dipped Crushed Candy Cane Ice Cream Cones

1 box sugar cones
8 oz chocolate candy bark
10 crushed mini candy canes

1. Place chocolate candy bark in microwave safe bowl and microwave for 90 seconds and stir. Continue microwaving at 15 second intervals stirring after each until chocolate is melted and smooth.
2. Dip top of sugar cone in chocolate.
3. Sprinkled crushed candy canes on top.
4. Place dipped cone on a piece of wax paper to harden.
5. Serve with Peppermint Ice Cream.

Hope you all enjoy this recipe! This is definitely one that I will be keeping on hand to try with different mix-ins! What is your favorite ice cream flavor?


Tuesday, December 18, 2012

Peppermint & White Chocolate Cupcakes


With Christmas just over a week away, have you thought about what sweets you are going to leave for Santa this year? There's certainly nothing wrong with the standard cookies and milk and of course some carrots for his reindeer. But this year, why not switch things up a bit and leave Santa some fabulous Peppermint Cupcakes with White Chocolate Frosting! He will have fresh breath for sure as he delivers presents to all the good little boys and girls!

If you love peppermint as much as I do then you must give this recipe a try. It's a simple white cake baked with peppermint chips and frosted with white chocolate icing and candy canes sprinkled on top.

Head over to Half Baked for the recipe. Happy Holiday Baking!

Friday, December 2, 2011

Hot Chocolate Cupcakes with Peppermint Buttercream

It's the most wonderful time of the year! This is my absolute favorite month to bake! Cookies, candies, pies and cakes are all on my baking to do list this holiday season! To start things off I've creates a new recipe for Hot Chocolate Cupcakes with Peppermint Buttercream! This quite possibly is one of my all time favorite cupcakes!

Chocolate and Peppermint are an amazing flavor combination. Topped off with some homemade peppermint bark, these cupcakes are sure to be one festive treat at your holiday party this year! I will certainly be making them again to share with family and friends in the coming weeks.

Head on over to Half Baked for the cupcake and peppermint bark recipes! Wishing you all a wonderful holiday filled will all sorts of yummy sweets!

Wednesday, December 29, 2010

Gingerbread Peppermint Bark

I hope everyone had a wonderful Christmas! I was lucky enough to have a white Christmas this year, the snow was beautiful! As usual, I overdosed on cookies, cakes and pies. Thank goodness for kickboxing these past 2 days to help burn some of those holiday calories! Before we head into the New Year I wanted to leave you with one last holiday dessert post!

My nieces and nephews favorite holiday treat is peppermint bark. Over Thanksgiving they were requesting some bark for Christmas, so as promised I fulfilled their wishes, only this year I added a special twist. I'm sure these gingerbread chocolates have already been devoured, but they are just too cute that I had to post the recipe with you even though Christmas is over!

I bought gingerbread cookie cutters, and layered them with milk chocolate on the bottom. Then added a layer of white chocolate on top that had crushed candy canes.

Then added sprinkles for buttons and eyes!

I love how these cute little gingerbread turned out.

Once the chocolate has hardened you just pop out the gingerbread chocolate bark from the cookie cutter.


For shipping purposes I left the chocolate bark inside the gingerbread cookie cutters. This way the cutter doubles as cute packaging and also the kids can use the cutters later to make some cookies!

Gingerbread Peppermint Bark

-10 gingerbread cookie cutters (or desired shape)
-1 package Milk Chocolate Almond Bark
-1 package White Chocolate Almond Bark
-6 crushed candy canes
-sprinkles

  • Line baking sheets with wax paper.
  • Place cookie cutters on prepared baking sheets.
  • Melt Milk Chocolate Almond Bark as package directs and pour into cookie cutter about 1/3 of the way up the side. Allow chocolate to harden.
  • Melt White Chocolate Almond Bark as package directs and mix in crushed candy canes.
  • Pour White Chocolate & candy cane mixture into cookie cutter on top of Milk Chocolate layer.
  • Place sprinkles on top of peppermint layer to make eyes and buttons.
  • Allow bark to completely harden before trying to remove from cookie cutter. To remove from cutter gently press from the bottom and push up, the chocolate should come out easily.
  • Or keep bark in cutters an package up to give as gifts!
Thanks so much for all your support and comments in 2010. I'm looking forward to sharing more sweets with you all in 2011. There's also a blog redesign in the works that I'm hoping will be finalized soon, can't wait to share the new look with you!

Happy New Year!

Wednesday, December 22, 2010

Chocolate & Peppermint Candy Cane Cake Balls


I still can't get enough of chocolate and peppermint this year! You may remember my Chocolate & Peppermint Whoopie Pies. I thought those were melt in your mouth delicious, but I think these Chocolate & Peppermint Candy Cane Cake Balls just one-upped them. I have been popping these into my mouth one after another, I'm addicted.

If you are looking for the perfect dessert for your Christmas party, this is absolutely the one you must make! I have taken these to two parties this past week and this is the one dessert that gets completely devoured in no time!

So here's what you need:

1. Chocolate Cake Recipe: I used Maratha Stewart's One Bowl Chocolate, a box mix would work just as well

2.Peppermint Buttercream: recipe from my Chocolate & Peppermint Whoopie Pies

3.White Chocolate Candy Melts: 2 bags, you can buy them at your local craft store

4.Candy Canes: 6-8 crushed for garnish

  • Bake cake per desired recipe in a 9x13 pan. Once cake cools cut into large chunks and grind up in food processor to fine crumbs. Pour cake crumbs into large bowl.
  • Add about 1 - 1 1/2 cups peppermint buttercream to cake crumbs and mix with spatula until cake will form into a ball. Roll cake balls and place onto wax paper lined cookie sheet.
  • Melt 2 bags of candy melts in microwave per package directions.
  • Using a spoon gently place cake ball into melted chocolate and roll around to cover completely. Remove cake ball with spoon, lightly tapping off excess chocolate back into the bowl and placing ball on cookie sheet. Garnish with crushed candy cane.
  • This will make about 50 cake balls.
These are so good and I want to share them with my family, but since I promised my husband I wouldn't do any baking while we are in KY I might have to convince my sister to make these for me. Emily if you are reading this, will you please please please make these cake balls for Christmas Eve! Pretty please with Candy Canes on top?

Friday, December 10, 2010

Cupcake a Week: Peppermint & White Chocolate


Last night I had a few friends over to decorate cupcakes and cookies! It was fun to share my love of baking and decorating with friends. I took tons of pictures of all the crazy cookie decorations and will try and get them uploaded this weekend, but for now I want to share with you one of the cupcake flavors from the party! Last year I made Paula Deen's White Chocolate Peppermint Cake for a Christmas party and it was a huge hit! So this year I decided to bake cupcakes instead! This recipe is absolutely amazing full of peppermint and red bits of color throughout the cake. A white chocolate buttercream on top is the perfect flavor compliment!

Add some mini candy canes on top and you've got one festive cupcake!

I can't believe this year is almost over and I've still kept with my cupcake a week theme for 49 weeks...wow that is crazy! There are still 3 weeks left for me to feature new cupcake recipes or decorating ideas! I've got a few ideas popping around in my head to finish off the year and holiday season, but if you have something you want me to try send me a message and I'll see what I can come up with!

Have a great weekend! Check back soon for more holiday goodies!


Monday, December 6, 2010

Chocolate & Peppermint Whoopie Pies

First up...I just posted the winner of the $55 CSN store giveaway...check here to see if you are the lucky one!

Next line of business...PEPPERMINT! Since pumpkin was the star of the show during November I figured it was only fair to followup up December with another great "P" ingredient, Peppermint! I enjoyed making pumpkin whoopie pies so much that I wanted to tackle this delectable sandwich cookie once again and make some Chocolate & Peppermint Whoopie Pies! I think I'm in love! Look out York Peppermint Patties there's a new Mint treat in town!

I first discovered Whoopie Pies from Bakerella when she did a post back in July from the book Whoopie Pies. Let's just say this book is on my Christmas list!

You really can't go wrong with anything from Bakerella's site so I decided to give the chocolate whoopies a whirl! Chocolate and peppermint are a perfect combo so I whipped up a batch of peppermint buttercream for the filling to create this delicious holiday treat! A little sprinkle of crushed candy canes on the edges, jazzes up these sweet little cookies!


Classic Chocolate Whoopie

adapted from Whoopie Pies (I used granulated sugar instead of dark brown sugar...everything else is the same)

Ingredients:

-1 2/3 cups all-purpose flour
-2/3 cup unsweetened cocoa powder
-1 1/2 teaspoons baking soda
1/2 teaspoon salt
-4 tablespoons unsalted butter, room temperature
-4 tablespoons vegetable shortening
-1 cup granulated sugar
-1 egg
-1 teaspoon vanilla
-1 cup milk

  • Preheat oven to 375 degrees.
  • Line baking sheets with parchment paper.
  • In a bowl, sift together, flour, cocoa, baking soda, and salt.
  • In another bowl, beat butter, shortening and sugar with a mixer on low until just combined. Increase speed to medium and beat for about 3 minutes.
  • Add egg and vanilla and beat for two more minutes.
  • Add half of the flour mixture and half of the milk and beat on low until incorporated. Repeat with remaining flour and milk and beat until combined.
  • Using a tablespoon, drop batter on baking sheet two inches apart. Bake for about 10 minutes each or until pies spring back when pressed gently.
  • Remove from oven and cool for about five minutes before transferring them to a rack to cool completely.
Makes 50 cookies, enough for 25 pies.

Peppermint Buttercream

Ingredients:
-1 1/2 sticks unsalted butter, softened
-4 cups confectioner's sugar
-1/4 cup milk
-1 teaspoon peppermint extract
-6 candy canes, crushed for garnish

  • In bowl of electric mixer cream butter on medium speed.
  • Gradually add confectioner's sugar and milk and mix well.
  • Mix in peppermint extract.
  • Place peppermint buttercream in plastic bag and pipe a dollop on flat side of cookie. Sandwich together with another cookie.
  • Sprinkle filling with crushed candy canes!
One bite of these babies and you will have the freshest breath in town!

Saturday, December 19, 2009

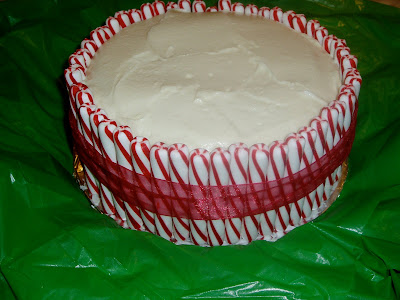
Countdown to Christmas Day 19: White Chocolate Peppermint Cake


Happy Dec 19th! I am running on EMPTY right now. These last 48 hours have been extremely hectic baking, babysitting, sleeping for 2 hours, running 10 miles, re-baking the cake above...we will get to this story in a minute, attending a Christmas Party, singing Christmas songs, and now typing up this blog post. It has been a whirlwind weekend so far and I'm looking forward to getting some much needed sleep tonight. But before I go rest my head I need to give you the history behind this White Chocolate Peppermint Cake.

I woke up bright and early yesterday morning at 5:45AM to start my baking for the Christmas Market and Parade today. I baked 5 dozen cupcakes and decorated them as snowmen and reindeer, made 100 chocolate covered brownie lollipops with sprinkles, made 3 batches of white chocolate pretzel bark, made 1 batch of peppermint bark, and a huge batch of homemade hot chocolate mix....as well as made the cake above the FIRST TIME. All of my baking was finished, only some decorating left to do and I decided I wanted to go take a run to get out of the kitchen for a few minutes. As I'm in my bedroom changing into my running clothes, I hear some commotion going on in the kitchen, I walk out to find my dog...yes the big black lab I showed you a few days ago with his honey love biscuits....eating my peppermint cake right off of the counter...front paws perched up half of one cake layer has been devoured and crumbs are all over the floor. I couldn't believe my eyes...never has my dog ever grabbed for sweets off of the counter before. I was filled with anger, didn't know what to do, I knew I was pressed for time and didn't think I would be able to remake the cake, allow for it to cool, make the icing and decorate it all before the Christmas Party I was planning on taking the cake too. So I continued to go for the run as planned, cleared my head and put together a game plan to come home and remake the cake a 2nd time. I whipped together another batch of the peppermint cake....let it cool and then had to leave to babysit. Got home from babysitting around 1:00AM...knew I had to wake up and run at 5:00AM, be at the Christmas Market from 9:00AM - 3:00PM...and the Christmas Party that this cake was going to started at 5:00PM....so I was contemplating...it is 1:00AM do I ice the cake now....or wait until 3:00PM tomorrow and rush to ice the cake and hope everything goes well to pull this off before the 5:00PM party...are you following me? Me being the crazy person that I am decided to deprive myself of the maximum 4 hours of sleep I knew I was going to get and go ahead and ice the cake at 1:00AM this morning....so I made the icing...following the directions which called for 9 cups of powdered sugar...I thought this was a lot of sugar....it said to add the sugar gradually so I was adding it by 2 cups at a time...I got to 6 cups and the consistency of the icing looked perfect for spreading, but I decided to go ahead and add 2 more cups, afterall the recipe called for 9 cups...and this is when disaster struck...the icing consistency became too stiff and I knew right then and there it wasn't going to be spreadable for the cake that I had already made 2 times. I was determined that I was going to get this icing to work, I took my offset spatula and tried to spread the icing on my four layer cake and it just wouldn't budge...it was way too stiff. It was now after 2:00AM and I didn't know what to do...I decided there wasn't much I could do at this point so I went to bed and decided in the morning I would figure out a new plan. I woke up 2 hours later rushing out the door to run and then headed straight to the holiday market. My new plan was going to be to re-ice the cake after the market and before the party...afterall I was not going to let this cake defeat me because I had already baked it twice at this point. So I came home and made another batch of the icing stopping after 6 cups confectioners' sugar this time, and it was perfect. The consistency was spreadable and the icing turned out so smooth on the cake. Finally, this peppermint cake I was so determined to make was a succes, after 2 rounds of baking and 2 rounds of making the icing! I mean afterall, the main reason I wanted to make this cake was for the peppermint stick and red ribbon decorations on the outside. This is one of the most festive cakes I have ever seen and I thought it would be perfect for a holiday party! I first discovered this cake idea last year in Paula Deens's Nov/Dec magazine issue.

So I just got back from the Team in Training Christmas Party where I took this cake for dessert and it was a huge hit. Everyone raved about how cute it looked with the peppermint sticks and about how delicious it tasted! I am so glad, that I didn't let this cake get the best of me and that I worked through the dilemmas I faced and made sure I came away with a final cake that I was proud of.


This cake is actually made from two 9-inch cakes and then each layer is sliced into two to create a 4-layer cake. Look at those specs of peppermint in the cake layers...it looks like layers of red confetti. Peppermint extract was also used for flavoring...this was such a refreshing cake and very moist.


Here's round 2 of the iced cake. Look how smooth the texture of the icing is, and so much easier to ice than the first time. Yes, I acutally peeled off all the original layer of icing from my first batch since it was so stiff and barely even spreadable.


Decorating cake with peppermints sticks. I just love the red & white swirl of the sticks, the red adds such a bold punch of color.


I found these Sweet Stripes peppermints in the checkout isle at Walmart...it took 4 bags to go around the entire cake.


White Chocolate Peppermint Cake (Paula Deen, Nov/Dec 2008 Magazine issue)

Ingredients

1 cup butter, softened
2 cups sugar
4 large eggs, separated
1/2 teaspoon peppermint extract
3 cups all-purpose flour
2 teaspoons baking powder
1/4 teaspoon salt
1 1/4 cups heavy whipping cream
1/3 cup sour cream
1/2 cup crushed peppermint candies

  • Preheat oven to 350 degrees. Spray 2 (9-inch) round cake pans with nonstick baking spray.
  • In a large bowl, beat butter and sugar at medium speed with an electric mixer until creamy. Add egg yolks, one at a time, beating well after each addition. Beat in peppermint extract.
  • In a medium bowl, combine flour, baking powder, and salt. Gradually add to butter mixture, alternately with cream, beginning and ending with flour mixture, beating just until combined after ead addition. Stir in sour cream and crushed peppermints, just until combined.
  • In a medium bowl, beat egg whites at high speed with an electric mixter until stiff peaks form. Gently fold into batter.
  • Spoon batter evently into prepared pans. Bake for 26 to 28 minutes, or until a wooden pick inserted in center comes out clean. Let cool in pans for 10 minutes. Remove from pans, and cool completely on wire racks. Wrap cake layers in heavy-duty plastic wrap, and chill for at least 1 hour or up to 24 hours.
  • Using a serrated knife, cut each layer in half horiontally to make 4 layers. Place 1 layer, cut side down, on a cake plate; spread with 1/2 cup White Chocolate Frosting. Repeat procedure with remaining 3 layers. Spread sides and top of cake wiht remaining frosting. Garnish with peppermint sticks if desired.
White Chocolate Frosting

Ingredients

8 (1 oz) squares white chocolate
3/4 cup heavy whipping cream
3/4 cup butter, softened
1 teaspoon vanilla extract
9 cups confectioners' sugar (I found 6 cups was plenty!)

  • In a medium bowl, combine white chocolate and cream. Microwave on High in 30-second intervals, stirring between each, until chocolate is melted and smooth (about 1 1/2 minutes total). Let cool completely.
  • In a large bowl, combine chocolate mixture and butter. Beat at medium speed with an electric mixer until creamy. Add vanilla, beating until combined. Gradually add confectioners' sugar, beating until smooth.
This cake definitely tastes as good as it looks and it was well worth the troubles I went through to finally come away with a successful and yummy cake!

ENJOY!

Thursday, December 17, 2009

Countdown to Christmas Day 17: Peppermint Bark


Happy Dec 17th! Today's sweet treat is Peppermint Bark! Chocolate and peppermint, what a great combination! Every year at Christmas time you always see this famous peppermint bark in Williams-Sonoma, so I figured I would re-create it in my own kitchen! Look how good those layers of dark and white chocolate look with the crushed peppermint sprinkled on top! This is definitely a must have holiday treat!


First you melt your dark chocolate and spread it out on a waxed paper lined baking sheet and allow to set up. Then melt your white chocolate and spread on top. And finally, sprinkle the white chocolate layer with the crushed peppermint! It's as easy as 1, 2, 3!


Peppermint Bark

Ingredients

3 cups good quality chocolate chips
12 oz good quality white chocolate chips
1/2 teaspoon peppermint extract
1/2 cup crushed candy canes

  • Crush candy canes, enough to yield 1/2 cup and set aside.
  • Melt chocolate chips in a double broiler or microwave. Pull off heat while there are still some lumps remaining and stir until smooth. Pour melted chocolate onto cookie sheet and spread out to thickness desired. Let harden.
  • Melt white chocolate chips. Add peppermint extract. Let cool a bit and then pour over top of hardened chocolate layer and smooth.
  • Sprinkle crushed candy canes on top and very gently pat them into the white chocolate. Let harden.
  • Break apart bark.


ENJOY!

Tuesday, December 8, 2009

Countdown to Christmas Day 8: Chocolate Peppermint Sandwich Cookies


Countdown to Christmas continues with another cookie recipe! The cookies I am about to share with you are very very important...not only because they contain chocolate & icing, not only because they are extremely cute and very delicious, not only because they are a festive treat you can take to a holiday party, but because I am entering them into the Mrs. Kringles Cake 'N Crumbs Holiday Cookie Bakeoff Competition! So if I could ask one Christmas Wish of all my fantastic blog followers this Christmas it is that you VOTE for my Chocolate Peppermint Sandwich Cookies.


I came across this cookie contest when looking at one of my favorite blogs I follow daily, Picky Palate, which mentioned the cookie bakeoff being hosted by Tongue N Cheeky. Once I read the rules and the prize full of all kinds of baking goodies for this competition I knew I had to take a chance and enter a cookie recipe. So I started thinking about what ingredients I would want in my favorite cookie...chocolate of course, ooey gooey icing for added SUGAR and sprinkles to give it an extra special touch.


My friend Molly had just brought me the Martha Stewart Holiday Sweets magazine so I thought I would flip through this for some inspiration...afterall how can you go wrong with anything made by Martha! Sure enough Martha had just what I was looking for Chocolate Sandwich cookies filled with a layer of icing! So I decided to take on the challenge of conquering one of Martha's mouthwatering cookie recipes but put my own personal holiday twist on it by cutting the cookies in Christmas Tree and Candy cane shapes and rolling the icing edges into sugar crystals and crushed up peppermint for an extra special touch!


Chocolate Peppermint Sandwich Cookies (adapted from Martha Stewart Holiday Sweets magazine)

Makes 15 sandwich cookies

Ingredients
3/4 cup all-purpose flour, plus more for dusting
1/3 cup unsweetened Dutch-process cocoa powder
1/8 teaspoon salt
6 tablespoons (3/4 stick) unsalted butter, softened
3/4 cup confectioner's sugar, sifted
1 large egg
1/2 tesapoon pur vanilla extract
Filling (recipe follows)
Vegetable-oil cooking spray
Sugar crystal sprinkles
Crushed candy canes

  • Line baking sheets with parchment paper; lightly coat with cooking spray. Whisk together flour, cocoa, and salt. With an electric mixer on medium-high speed, cream butter and confectionrs' sugar until pale and fluffy. Beat in egg and vanilla. With mxer on low speed, gradually add flour mixture, beating to combine. Divide dough in half; form into disks, and wrap in plastic. Chill until firm, at least 2 hours, or up to 2 days.
  • Working with one disk at a time, roll out dought to a 1/8-inch thickness on a lightly floured surface. Using christmas tree and candy cane cookie cutters, cut out shapes transferring to prepared sheets (1 inch apart) as you work. Chill in freezer until firm, about 15 minutes. Brush off excess flour. Gather together scraps, roll, chill, and cut out more shapes.
  • Preheat overn to 325 degrees. Bake cookies, roatating sheets halfway through, until edges are firm, 12 to 14 minutes. Transfer cookies, on parchment, to a wire rack to cool completely.
  • Spread a small amount of filling on half the cookies. Top with remaining cookies; gently press to adhere. Assembled cookies can be refrigerated up to 2 days in an airtight container.
Filling

Makes 1 cup (enough for 15 sandwich cookies)

To make more than one flavor of filling, divide the butter mixture among small bowls (one for each flavor) and reduce the flavoring ingredients accordingly.

6 tablespoons (3/4 stick) unsalted butter, softened
2 cups confectioners' sugar, sifted
mint extract
peppermint extract

  • With an electric mixer on medium-high speed, beat butter until smooth. Add confectioners' sugar, and beat until light and fluffy.
  • Divide the filling into two bowls.
  • In bowl one: add a drop of mint extract and a drop of green food coloring to be used for the Christmas tree cookie filling.
  • In bowl two: add a drop of peppermint extract and a drop of red food coloring to be used for the candy cane cookie filling.
  • Roll the Christmas tree cookies into clear sugar crystals so they stick to the green icing and give a glistening snowlike affect.
  • Roll the candy cane cookies into crushed up candy canes to enhance the peppermint flavor of these cookies.


Sandwich cookies have been assembled and are ready for tasting! Don't you wish you were in my kitchen tonight to enjoy one of these cookies with me?


So I hope you will feel that these Chocolate Peppermint Sandwich Cookies are worthy of winning the Mrs. Kringles Cake 'N Crumbs Holiday Cookie Bakeoff. Please cast your vote for my cookies by visiting Tongue N Cheeky and leaving a comment about my cookies. Thanks for your support! Hope you have a very safe and happy holiday season!

Thursday, December 3, 2009

Countdown to Christmas Day 3: Peppermint Meringue Kisses


Happy Dec 3rd! Let's just say 2nd time's a charm with this recipe! I had never made meringue kisses before and my first trial run was a flop. The texture of the meringues was very foamy and when I put the mixture into the piping bag to squeeze out the stars they deflated and didn't retain their nice crisp shape that you see in the picture above. I decided to go ahead and bake them and see what happened, but as I suspected the texture still didn't turn out right after baking. I have a feeling the ratio of egg whites to sugar I was using is what caused the texture problem. I was determined to try again and find a recipe that I would be successful with. After searching through a few recipes online and looking at several different ratios of egg whites to sugar I decided to try again, this time modifying my recipe.


Meringue mixture seems to be the right consistency...the moment of truth will be how they look once they come out of the oven.


Using Wilton star tip 1M to pipe meringue kisses on parchment paper lined cookie sheet.


Meringue kisses going into the oven to bake.


Round 2 of meringue kisses was a success! The texture ended up being perfect, crisp on the outside yet once you put them in your mouth they just melt...delicious!


Peppermint meringue kisses are perfect for a holiday treat for your friends or co-workers because one batch makes a large quantity and with only 3 ingredients they are pretty cheap. I put 6 meringues in a sandwich bag and tied them off with a red snowflake ribbon and added a homemade label that I created using a scalloped punch and markers.

Peppermint Meringue Kisses

3 large egg whites
3/4 cup sugar
1/2 teaspoon peppermint extract
red food coloring

  • Put egg whites and sugar into a heatproof bowl set over a pan of simmering water. Heat, whisking constantly, until sugar is dissolved about 2 to 3 minutes.
  • Transfer egg-white mixture to the bowl of an electric mixer fitted with the whisk attachment. Beat on medium-high speed until stiff peaks form, about 15 minutes.
  • Beat in peppermint extract and food coloring 1 drop at a time, to achieve desired shade. (I wanted a light pink color).
  • Preheat oven to 175 degrees. Transfer meringue to pastry bag fitted with Wilton star tip 1M. Pipe 1-inch spiraled mounds with peaked tops onto baking sheets lined with parchment paper, spacing 1 inch apart.
  • Bake until meringues are crisp and can be removed easily from parchment, about 1 hour 40 minutes. Let cool on sheets on wire racks. Store in layers between pieces of parchment paper in airtight containers up to 1 week.
  • Makes 6 dozen.

ENJOY!
Related Posts with Thumbnails