Showing posts with label baby shower. Show all posts

Wednesday, June 5, 2013

Polka Dot & Chevron - Pink & White Baby Shower Sweets


So it has officially been FOREVER since I have last posted! Let's just say the month of May was pretty hectic in my house. Traveling for work, weekend trips, the AC was out = too hot to bake, Sam got sick...so exhaustion set in and baking and blogging took the back seat for a little while! But I'm back today with some fun baby shower sweets I've been super excited to share with you! 


I recently did some cookies and a cake for a pink & white baby shower theme. I always love this color combo! I think onesie cookies are my all time favorites to decorate for some reason! They are just the sweetest little cookie and I've probably made close to a 1000 of them in the lifetime of this blog (here, here, here, here) so they are pretty easy to decorate by now. I always love the way they look in bags with coordinating ribbons! Such sweet favors for party guests.


When it came to the cake for this shower I wanted to incorporate the theme from the invitation which had both polka dots and chevron patterns. I've seen a bunch of amazing chevron cakes recently, but unfortunately my cake decorating skills are no where near the skill level of those amazing decorators so I opted for a more fun, playful, diy version to incorporate the chevron by using some cupcake liners I had on hand left over from when I made these Champagne & Raspberry Cupcakes.


I found a tutorial online from Icing Designs that was so super simple and produced beautiful results in no time. I will definitely be using this cupcake liner flower in the future!

I love the combo of the dark pink chevron and pale pink and white polka dot liners.


So what do you all think of the cupcake liner flowers...pretty cool right? I love the simplicity of this plain white cake with the wow factor of the flower liners on top!

I hope you were inspired by these pink and white baby shower sweets!


Sunday, February 19, 2012

Bow Tie Cupcake Toppers


Bow Tie Baby Boy shower themes seem to be a new trend these days! I was so excited when my friend Hannah contacted me about making some bow tie cupcakes for her sister's baby shower! She sent me the shower invite for color inspiration and I absolutely fell in love! I think it's because her colors for the shower featured some of the same colors...green, blue and orange that we are currently decorating our nursery in for the arrival of our little boy in just over a month!

Unfortunately I didn't snap photos of the step-by-step process of making these bow ties but the they are super simple.

Bow Tie Supplies:

-fondant (tinted in the colors of your choice)
-a 1.5" square cutter
-a round cutter (I used the end of a decorating tip)
-a Pastry Wheel
-fondant roller & cutting mat
-paint brush
-water

1.Tint fondant desired colors.
2.Roll out colored fondant using fondant roller on cutting mat.
3.Use 1.5" square cutter to cut out square shapes.
4.Use your pastry wheel to cut diagonally through your square shapes to make an "X". This will create 4 triangles within the square and give you 2 bow tie shapes.
5.Pull apart the triangle shapes opposite each other to use for a single bow tie.
6.Place triangle shapes tip to tip with a little space in between.
7.Cut out your round fondant shapes to create the center of the bow tie.
8.Using a small dab of water and your paint brush place water on the triangle tips of each bow tie and place the round circle on top. Allow to try overnight.
9.Once fondant bow ties have hardened then place on top of cupcakes.

If you want to create some custom bow ties with different patterns such as stripes or polka dots then start by rolling out white fondant and making the bow ties following the steps above. To paint designs on them you will need a little vodka, color gel and a paint brush. Put a small dab of color gel on a paper plate and add the tiniest drop of vodka to the color and mix with your paint brush. Then start drawing your patterns on the bow ties. The vodka/gel mixture will dry overnight and you will have some super cute bow ties!

I was thrilled with how these turned out and just couldn't help snatching a ton of pictures! Hope you enjoy! I definitely think I'll be using the bow tie theme sometime in the near future with a party theme for our little boy!


Saturday, January 21, 2012

Due Date Cookies

As you may remember from this post I am expecting a little one coming in March! Well since that last post we have found out we are having a little boy! I can't believe the time has flown by so fast and he will be here in just under 9 weeks! To share the exciting news I thought it would be fun to create some "due date" cookies. This is my spin off of some wedding save the date cookies I came across one day while browsing the web. Our little boy will be here on or around March 22! There's still lots to do with decorating the nursery and coming up with a name!

I'm so excited that I get to share in this exciting time with my great friend Jennifer who is also pregnant with her first child, a little girl coming just 6 weeks before our boy! You may remember the gender reveal cake I made for Jennifer! So of course I had to make Jennifer and baby Cora some of their own cookies too!

Jennifer and I have had a great time being pregnant together and sharing all kinds of crazy stories about our growing bellies and nursery plans! I'm so glad I have a great friend to share in this amazing experience with! Our kids will be instant friends and we always joke and say they will get married some day!

Stay tuned for more baby updates! I'm excited to see if these due date cookies are accurate for both of us!

If you have any suggestions for little boy names I'd love to hear them!

Tuesday, November 15, 2011

Pink, Orange & Green Baby Shower Cookies


Here's a look at some cookies I recently made for baby shower favors. My sister's good friend is expecting her first baby on Dec 5th, a little girl. They picked out some fun fabrics with stripes and polka dots for the nursery in pinks, orange and green so we thought it would be fun to decorate cookies to fit the color scheme.

Baby shower cookies are some of my favorites to decorate so of course I documented the process with lots of pictures....


This was by far the biggest batch of cookies I have ever decorated at one time.
40 onesies....40 bottles...40 monograms for baby Harper
5 1/2 hours later my hand was very cramped after all that piping...

but I was thrilled with how they turned out!


The cookies were carefully packaged and wrapped in layers of bubble wrap to be shipped 725 miles to KY for the shower! Two huge boxes of cookies later I dropped them off at the post office and said a few prayers for the safe journey of these cookies! As it turns out all but 2 arrived safely...and the 2 that cracked my sister was happy to sample so it all worked out in the end!

The mother to be loved the cookies and so did all the shower guests! Congratulations Ashley on your little girl that is on the way!

Friday, October 28, 2011

It's a Boy...It's a Girl?????

Baby bumps are everywhere right now! I literally know about 10 people pregnant with babies due between now and April! It is so fun to be surrounded by so many friends at different stages in their pregnancy and to watch their bellies grow! Andy while we are on the topics of babies...I have one more surprise to share with you...I am expecting too! I am 19 weeks!

The time has been going by so fast and next week we will be finding out the gender! I have been dying to share the news for some time now and even have a cute cookie idea planned to share too...so I hope to get to that next week after we find out if it's a boy or a girl! And I must admit that this is part of the reason for my lack of posts lately! From about 6-15 weeks I was very nauseous. Just the thought of anything sugary made me sick, especially all things cake! It was the weirdest thing and something I never imagined could happen to a sugar and cake lover like myself! I am slowly getting back into baking more but still have not really wanted to even eat a bite of cake or icing! This may be a good thing though so I don't pack on the extra pounds from sugar cravings during the pregnancy!

Its seems like one of the most popular cookies I make are onesies for baby showers. They are so much fun to design b/c you can customize them a million different ways. My cousin's wife Cassandra is due in January but they have decided not to find out the sex. So for her recent baby shower, I thought it would be fun to just stick to the traditional pink and blue colors and make some onesie and baby bottle cookies.

There are going to be lots more baby showers and probably onesie cookies in my near future! What are some of your favorite baby shower themes? I'd love to start brainstorming some new ideas for cookies, cupcakes or anything sweet!

Tuesday, September 27, 2011

Fondant Animal Cupcake Toppers

Lately I've been getting a lot of requests for kid themed birthday or baby shower parties! I must admit these are some of my favorite events to bake and decorate for. There are just so many cute ideas out there and inspiration can come from anywhere, a t-shirt, invitation, toy, fabric, etc. I created these fondant animal cupcake toppers for a boy themed baby shower inspired by the bedding for the nursery. I am thrilled with how the entire collection turned out.

Mr. Elephant...my favorite!

Here's Mr. Monkey! (or a bear according to my husband)

The Lion (or tiger, again according to my husband)

Mr. Giraffe...these are my next favorite!

And finally the Zebra!

I also made monogram "G" toppers for the babies name "Gage".


In addition to chocolate and vanilla cupcakes I made a small carrot cake for the mother-to-be to take home and share with her hubby after the baby shower!

Hope you enjoyed this fondant animal collection!

Sunday, August 14, 2011

Tutorial: How to make Fondant Owl Cupcake Toppers

Owls seem to be popping up everywhere these days in party decor for baby showers and kids birthday parties. One of my friend's has even chosen an owl print for her soon to be baby boy's crib bedding. There are so many fun interpretations I have seen around the web for owl cookies, cakes, cake pops and invitations in an array of colors from pinks/greens, blue/browns, and even shades of purple. I just love how cute these little creatures are when recreated with sugar! So this weekend I finally got a chance to put my own spin on the owl theme when asked to make some baby shower cupcakes. Using the baby shower invite as inspiration I decided to make some fondant owl cupcake toppers that I think turned out absolutely adorable!

You too can make these fondant owls in a matter of minutes with a few shades of colored fondant and some different shaped cutters. Let me show you how with this step-by-step photo tutorial!

First you will need to tint fondant to your desired colors. This shower was for a baby girl so pink was my dominant color. Feel free to switch things up with blues, greens, purples, etc.

Here's the breakdown on the colors for my owls:

Dark Pink = owl body
Light Pink = wings
Orange = feet & nose
White = eyes & circular base for fondant topper
Black = eyes

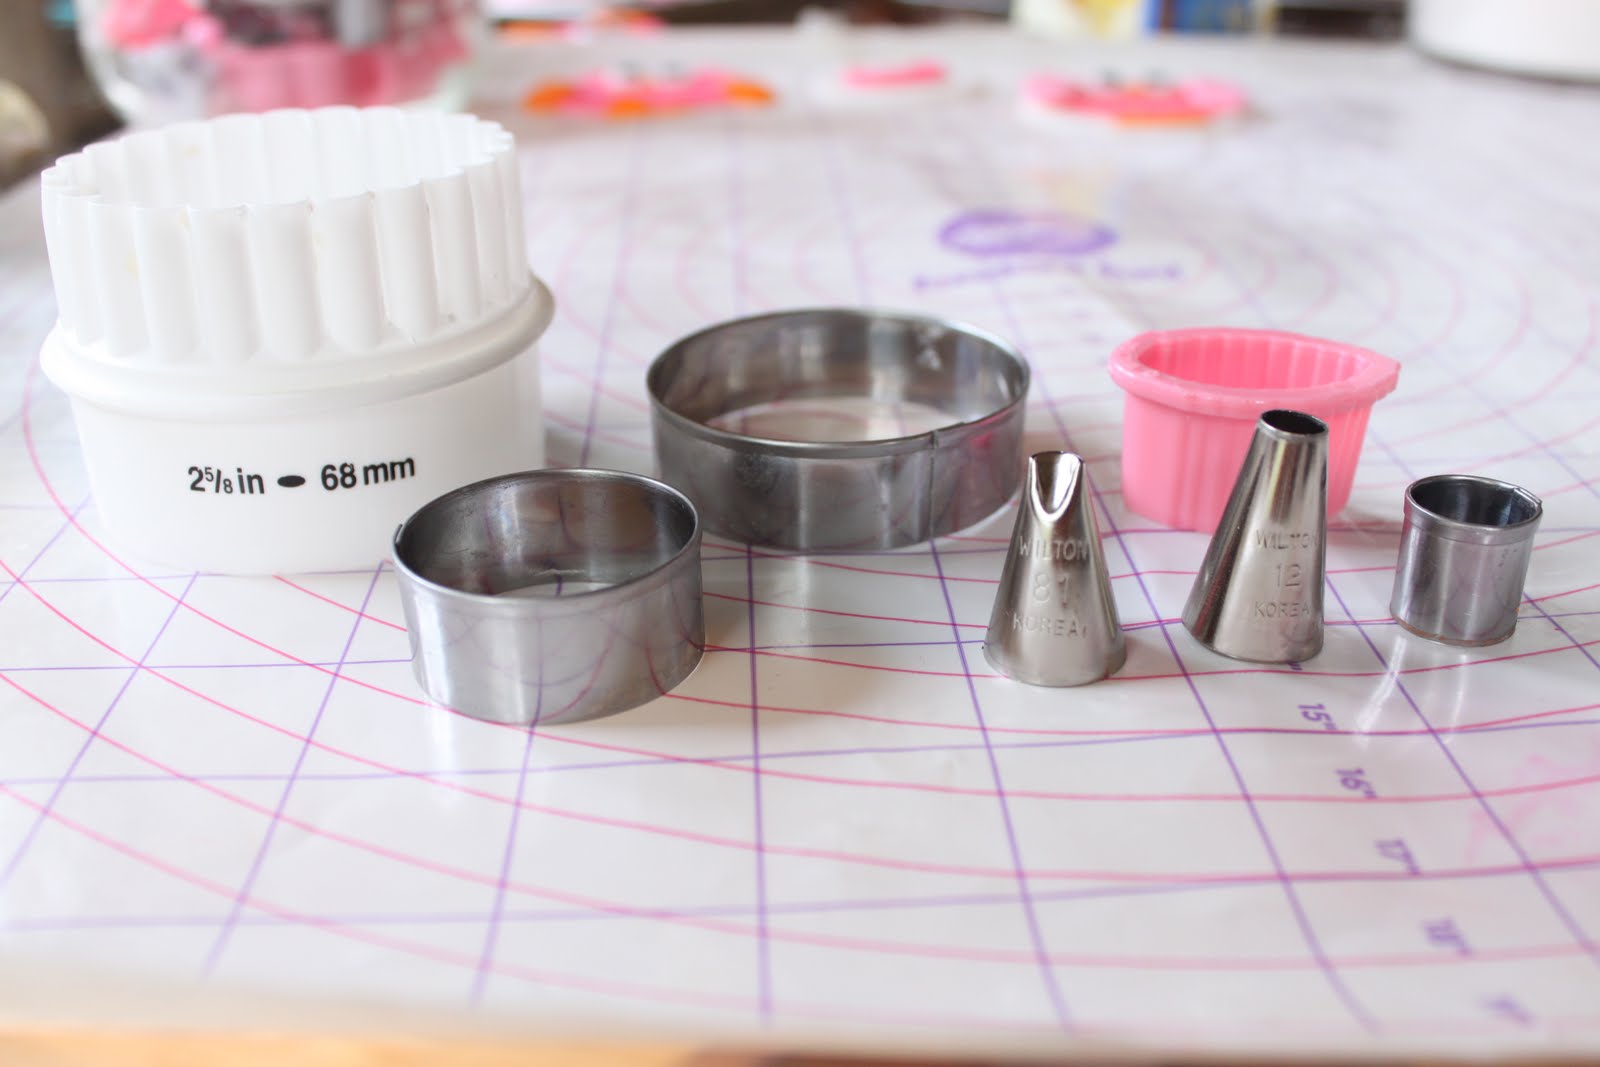
You will need to following tools:
-2 5/8" round cutter (mine is from this set)
-set of 3 round cutters: small, medium, large
-leaf cutter
-Wilton round tip #12
-Wilton curved tip #81
-rolling pin
-offset spatula
-small cup of water
-paint brush

A few notes:
-Once you have rolled out the fondant and cut out the shapes I find it is easiest to use an offset spatula to slide underneath the shapes and lift them up when moving to create the owl shape.
-If you are making a large quantity of owls it is easier to set up an assembly line and make all of the same shapes first then move on to the next shape, rather than making each owl individually. Once you have all your shapes made then go back and assemble all the pieces.
-As you start to assemble you may notice that your fondant has started to harden and dry some, if this happens then use a small paint brush and dip in a cup of water and gently apply water on the pieces you need to assemble. Using a dab of water will help all pieces of the owl stick together and harden together.

Roll out some white fondant and cut a circle using the 2 5/8" cutter.

This circle will be the base of your fondant topper that you will place the owl on top of.


Roll out some Dark Pink fondant and cut with the large circle cutter.

This shape is the base of your owl body.

Take the medium circle cutter and cut out a small notch from the top of the circle.

This creates a curved shape for the head of the owl and the pointy ears.

Place the body of the owl on top of the white fondant circle.

Roll out some light pink fondant and use the leaf cutter to make the wings.

Place the wings on the sides of the owl body. It's starting to take shape!

Roll out some white fondant and using the small round cutter make the owl eyes.

Roll out some black fondant and using tip #12 make the inside of the owl eyes.

Your owl can now see! Only a few more steps...

Roll out some orange fondant and use the small round cutter to make a circle. Cut the circle in half with the offset spatula to create the feet.

Place the feet underneath the owl's body with the curved side touching the belly. Cut a small triangle nose from the orange fondant using the offset spatula.

One more step...feathers! Grab tip #81.

Place the curve side of the tip down into the belly of the owl so it make a "U" shape. Gently press the tip into the fondant and make some feathers. I did a row of 2, a row of 3 and another row of 2.

HOORAY! The owl is now complete!

So what do you think...pretty close replica to the invite?

Allow the fondant toppers to harden overnight and then place on top of your iced cupcakes! These owls can be made days in advance of your party as well if you don't want to be overwhelmed making decorations and baking all at the same time. If you do decide to make them in advance be sure NOT to put them in a tupperware container as the fondant will tend to soften and melt and all your hard work will be ruined.

I hope you found this tutorial helpful! If you decide to make your own fondant owls I'd love to see them so email me pictures or post on the CIS Facebook page.

Have a great week!
Related Posts with Thumbnails