Thursday, December 27, 2012

Peppermint Ice Cream & Chocolate Dipped Crushed Candy Cane Cones


What do you do with all those left over candy canes now that Christmas is over? Make Peppermint Ice Cream and Chocolate Dipped Crushed Candy Cane Ice Cream Cones!

This recipe is truly the easiest no fuss ice cream recipe I have ever come across and you don't even need an ice cream maker! Why is it so simple? It only involves 2 Ingredients! I know it sounds crazy, but it is absolutely true and perfectly delicious! I have seen "2 Ingredient Ice Cream" on several blogs before and it's been on my "to try" list for some time now. Well with an abundance of candy canes left over from Christmas I thought peppermint ice cream would be the perfect cool treat since I've done my fair share of eating cookies and cakes these last few days! And since you can't have ice cream without a cone, well of course a chocolate dipped cone with crushed candy canes is a necessity!


So grab some chocolate and melt it in a bowl. Dip the top of each cone in the melted chocolate.


Sprinkle crushed candy canes on top of each chocolate dipped cone.


Simple. Festive. Delicious.


I'm thinking white chocolate dipped cones would also be equally amazing!


Now that the cones are made, let's focus on the ice cream. All you need is 2 ingredients: heavy cream + sweetened condensed milk. Beat the heavy cream until stiff and then fold in the condensed milk. Stir in your favorite toppings - crushed candy canes & peppermint extract is what I used. Freeze for 6 hours. It really can't get any easier than this and honestly still tastes rich and creamy like any ice cream you would find at the store or from your favorite ice cream shop!


Scoop ice cream into a bowl and sprinkle with more crushed candy canes!
 

Or serve with a chocolate dipped cone!

2 Ingredient Peppermint Ice Cream
(inspired by Eagle Brand)

2 cups heavy cream
1 (14 oz) can sweetened condensed milk
20 crushed mini candy canes
1/2 tsp peppermint extract

1. Place heavy cream in bowl of stand mixer. Using whisk attachment beat on high for about 1-2 minutes until stiff.
2. Fold in sweetened condensed milk.
3. Add in crushed candy canes and peppermint extract. (Or any other mix-ins you prefer)
4. Place ice cream in a plastic container with a lid and freeze for 6 hours.

Chocolate Dipped Crushed Candy Cane Ice Cream Cones

1 box sugar cones
8 oz chocolate candy bark
10 crushed mini candy canes

1. Place chocolate candy bark in microwave safe bowl and microwave for 90 seconds and stir. Continue microwaving at 15 second intervals stirring after each until chocolate is melted and smooth.
2. Dip top of sugar cone in chocolate.
3. Sprinkled crushed candy canes on top.
4. Place dipped cone on a piece of wax paper to harden.
5. Serve with Peppermint Ice Cream.

Hope you all enjoy this recipe! This is definitely one that I will be keeping on hand to try with different mix-ins! What is your favorite ice cream flavor?


Sunday, December 23, 2012

Gingerbread Reindeer Cookies


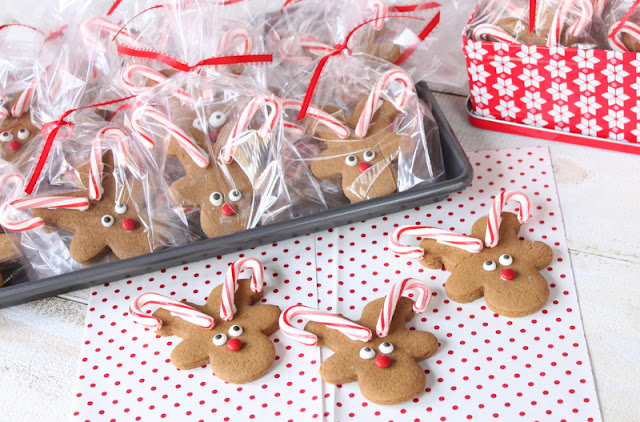
There's still time to squeeze in one more Christmas treat and these are so super cute and easy and something your kids will get a kick out of! These may look like your normal gingerbread men cookies...


but with the addition of a few candies...eyeballs, mini M&M's and candy canes...


and turning them upside down...Rudolph the Red Nose Reindeer comes to life! I first saw the idea for these "upside down" gingerbread reindeer cookies when a friend posted a picture on her Facebook page. The picture she posted had the reindeer antlers and face created using all piped royal icing. Instead of recreating the same look from the picture I saw I thought it would be a lot easier to just use some simple candies, one of which I'm sure you all have on hand this time of the year, mini candy canes. You will need a little bit of royal icing to attach all the candy to the cookies.

Here's step-by-step photos to bring Rudolph to life.


Aren't these the cutest Reindeer you have ever seen!


I used Bridget of Bake @ 350 Gingerbread Cookie recipe out of her new book Decorating Cookies: 60+ Designs for Holidays, Celebrations & Everyday. This recipe is delicious, and produces a thick and chewy cookie! I'm a long time follower of Bridget's blog and was so excited to get my hands on her new cookie book! Her cookie recipes are delicious and her decorating skills are beautiful. Her book is packed full of some amazing and unique cookie decorating ideas. One of the best parts is that her book shows step-by-step photos for decorating all her cookies. She really helps guide you through the decorating process from start to finish so you can create some beautiful cookies.


I packaged up these cookies and passed them out to all the kids at a local preschool I was volunteering at for their holiday party! If you are still looking for the perfect last minute treat to make with your kids this Christmas, these Gingerbread Reindeer Cookies are perfect!

Wishing you and your family a Wonderful Christmas!

Thursday, December 20, 2012

Hand Print Ornaments


This past weekend Sam and I got to bake for the first time together! I came across this super cute idea for hand print ornaments on Pinterest and knew this would be such a fun project to do with Sam for his first Christmas! He will be 9 months old on Christmas Day! He isn't going to have his baby hands forever so I wanted to capture his tiny fingers in a keepsake we can have for years to come. We invited Sam's "girlfriend" Cora over to join in on the fun. She was born about 7 weeks before Sam and they have already been on many "dates" together in the jogging strollers, out to lunch, parties and now making hand print ornaments!


Hand Print ornaments are so super easy to make and only require a few ingredients that everyone should have on hand...flour + salt + water = the most adorable ornament I've ever seen!

So let's get started.


Roll out your dough and use a large circle cutter to create the ornament shape.


Place "little hands" on top of dough circle and gently press down to create the hand print.


These first two pictures are of little miss Cora's adorable hands! She is a pro and possibly a future hand model!


Now here come's mister Sam's hand prints. Look at those chubby little fingers.


Two prints...


Three prints...


Time to bake!


Don't forget to press a hole into each ornament so that you can string a ribbon through them at the end to hang on your Christmas tree.


I'm loving the finished project! Don't these make a great gift idea too!


Hand Print Ornaments
(makes 16)


Materials:
-cookie sheets
-parchment paper
-rolling pin
-large circle cutter (I used 3 7/8")
-small circle cutter (I used a piping tip)
-ribbon

Ingredients:
-4 cups all-purpose flour
-1 cup salt
-1 1/2 cups water  

1. Preheat oven to 350 degrees.
2. Line baking sheets with parchment paper.
3. Combine flour, salt and water in bowl of stand mixer fitted with dough attachment and knead for 15-20 minutes.
4. Roll out dough on wax paper and cut out circles.
5. Place hands inside circles and gently press to create hand print.
6. Place hand print circles onto prepared baking sheet.
7. Use small piping tip to press a hole into the ornament before baking.
8. Bake for 20-25 minutes until dough has hardened.
9. Once the ornaments are cool string with a ribbon and hang on your tree.


Sam's ornament is my absolute favorite one on the tree this year! Right next to his little hand print is an adorable tree ornament that his day care made for him using his recent school pictures! What a fun surprise to receive when I picked him up from school!

There's still time to make these with your kids before Christmas! So go grab your flour and get rolling!

Tuesday, December 18, 2012

Peppermint & White Chocolate Cupcakes


With Christmas just over a week away, have you thought about what sweets you are going to leave for Santa this year? There's certainly nothing wrong with the standard cookies and milk and of course some carrots for his reindeer. But this year, why not switch things up a bit and leave Santa some fabulous Peppermint Cupcakes with White Chocolate Frosting! He will have fresh breath for sure as he delivers presents to all the good little boys and girls!

If you love peppermint as much as I do then you must give this recipe a try. It's a simple white cake baked with peppermint chips and frosted with white chocolate icing and candy canes sprinkled on top.

Head over to Half Baked for the recipe. Happy Holiday Baking!

Monday, December 17, 2012

Ice Cream Cone Ruffle Tree Cake


I hope you all had a wonderful weekend! I definitely enjoyed a weekend full of holiday baking (finally!!) so get ready for a week packed full of amazing sweets and treats with quick and easy ideas for all your holiday baking needs. First up is this winter wonderland cake I have been imagining for quite some time now. I am thrilled to share with you how simple and festive this cake is that you will be able to throw together in no time.

Recently I had the privilege of receiving some cake mixes to try from The Cake Mix Doctor. I'm sure you all have seen these cookbooks before am I right? Well Anne Byrn, the mastermind behind these books has recently launched a new line of cake mixes and I was lucky enough to get to sample some! Three boxes of cake mix (yellow & chocolate), recipe cards and a book full of frosting recipes showed up at my door...it was a GREAT day! Anne's dream was to create a line of cake mix that tasted like it was made from scratch, tender and moist and didn't have any artificial colorings or trans-fat. Well she has done just that and I must say her cakes are truly delicious!

So just in time for Christmas, the season of baking, cake making, recipe sharing and gift giving I'm here to share with you a winter wonderland cake that features Anne's Old Fashioned-Yellow Cake Mix. My vision was to create a white cake that looked like it was covered in snow and topped with some super simple ruffle Christmas trees. I iced the cake using one of Anne's signature recipes, Fluffy Marshmallow Frosting (recipe below) and covered the entire cake in shredded coconut. Yellow Cake + Marshmallow + Coconut = 1 amazing cake

Both the cake and frosting can be made in a matter of minutes! This is a huge time saver when we are all pressed for time during the holidays! So keeping with the them of quick and simple, the cake topper trees can be made in a matter of minutes as well. I always freeze any left over icing I have from previous projects, so I happened to have some buttercream icing on hand to use for the trees.

Here are the supplies you will need to create the trees:

Ice Cream Cone Ruffle Trees
-Sugar cones
-buttercream frosting (tinted desired colors)
-Wilton tip #103
-piping bags

1. Holding the base of the ice cream cone grab your piping bag fitted with tip 103. With the thin part of the tip toward you start piping in a slight up and down motion going around the cone to create a ruffle effect.
2. Continue with this same technique, layer by layer until the entire cone is covered in frosting.
3. Place a wooden skewer into the cone and stick finished cone into a styrofoam block until you are ready to place on top of the cake.

See below for pictures.


I am absolutely in love with how these ruffled trees turned out and they came together in a matter of minutes! If you so desire, feel free to add some sprinkles to the trees for a pop of color to look like they are covered in lights!


Living in Mobile, AL it sure hasn't felt the least bit like winter so far this year. The temps have still been getting into the 70s during the day! But just looking at this coconut covered cake makes me think of winter, cold air and snow that we will hopefully see when we travel to KY this week to spend Christmas with my family!

As promised above here is the recipe for the frosting!

Fluffy Marshmallow Frosting (The Cake Mix Doctor's Icing on the Cake)

1/2 cup granulated sugar
2 tablespoons water
3 large egg whites
1 jar (13 oz) marshmallow creme
1 teaspoon pure vanilla extract

1. Place the sugar, water, and egg whites in a heavy medium-size saucepan over low heat. Cook, beating continuously with an electric hand mixer on high speed, until soft peaks form, 2 to 3 minutes.
2. Remove the pan from the heat. Add the marshmallow creme and the vanilla and beat the mixture with the mixer on high speed until stiff peaks form, 2 minutes. Use the frosting at once.


So if you are looking for the perfect gift to give all the bakers in your life, why not give them the gift of cake! Check out The Cake Mix Doctor website and order some mixes online. Or check out the list of stores that currently sell the mixes. You could even put together an entire gift basket with all the supplies needed to make this Ice Cream Cone Ruffle Tree Cake. Fill the basket with cake pans, piping tips, coconut, sugar cones and of course the cake mix and you have got one perfect gift for the cake lover!

I hope you will give this cake a try!

Wednesday, December 12, 2012

Holiday Cards - In the Mail


Today is an exciting day...it's 12.12.12 how cool is that? Even cooler, is that I finally got my Christmas Cards addressed and in the mail...well at least the majority of them! I just had to share a sneak peak at the final Minted card we picked for Sam's first Christmas! In case you missed the cards that were in the running feel free to check them out here.

Something that's not so cool, is the fact that it is Dec 12...yes this month is almost half way over and I have yet to do any holiday baking! How this is even possible I do not know...oh wait yes I do...I have an 8.5 month old son that is constantly on the go! He is crawling, pulling up on the coffee table, getting into the kitchen cabinets, playing with the DVD player and repeatedly pulling ornaments off of our Christmas tree! So needless to say my flour and sugar are still in the pantry and the oven has not been used! I have big plans still to pull off some hopefully super cute sweats within the next few weeks that I can't wait to share with you all soon! One project involves Sam helping me out in the kitchen...it's going to be super cute!


Ok, now that my "no baking" tangent is over...I must just take a minute to rave about how much I am in LOVE with our Christmas Cards this year! Not only do they feature our absolutely adorable little boy, but I am so pleased with the quality of cards we received from Minted! Our cards arrived super fast, just 3 days after placing the order! The cards themselves were shrink wrapped and bundled with a green (my favorite color) ribbon...an extra special touch and something I wasn't expecting! We decided to go with both a front and back printed card this year! I loved the strand of lights on the front of the card, and when I realized their was an option to have the entire back covered in lights...well of course I said yes! I also decided to get some skinny wrap address labels. It sure does save some time hand writing your return address on 100 cards and it ads an extra festive touch to the cards as well with the "Merry Christmas" on the back. I hope our cards bring a little joy to our family and friends when they receive them in the mail in a few days!


Wishing you all a wonderful holiday season!

Thursday, November 29, 2012

Minted - Holiday Cards

It's the most wonderful time of the year! I am so excited for December I can hardly stand it! Tis the season for holiday baking, homemade candies, listening to Christmas music all day long, putting up the tree and of course picking out our family's Christmas Card! This year I am super excited for our cards because we get to show off our new addition to the family, our little boy Sam who will be 9 months old on Christmas Day. This year has been a huge blessing and the best year of my life with the birth of Sam. I can't believe how fast the time has gone and how much our little guy has changed over the last 8+ months. He is so active right now, crawling, talking all the time "da da, ma ma, ba ba", teething, waving and always smiling. He is so expressive and I try to capture as much of it on camera and video as possible! Yes, I'm one of those crazy moms that has her iphone or camera on her at all times so I don't miss a thing.

It was such a treat to have my friend Jamie of Jamie Lou Photography take our photos for this year's Christmas Card. She has already photographed Sam for his newborn pictures and some Fall pumpkin patch photos so I knew these holiday pictures would be amazing. The backdrop was a local Christmas Tree farm. One of my favorite parts about Christmas is the tree, so being amongst hundreds of trees for our photos couldn't have been any more perfect! I am thrilled with how the pictures turned out and it was definitely hard to choose which one to use for our cards. She captured so many candid moments of Sam, I just smile every time I look at them!

This year since it is our first Christmas as a family of three I wanted to make sure our cards were extra special. I decided to go with Minted to have our holiday cards printed. They have quite the selection of cards from traditional, fun and whimsical, vintage and simple and modern, there is definitely a card that will appeal to everyone. Their designs are so happy and cheerful and their fonts are so fun. I have seriously browsed their site a dozen times just trying to narrow down the designs I like best. So many beautiful cards to choose from!

The card that first caught my eye was this adorable Twisted Peppermint Holiday Postcard. I absolutely love the idea of sending a postcard in the mail. With options for pictures on both the front and back, and your return address already printed, you save half the time in addressing your cards. Not to mention there is no envelope you have to lick over and over a million times!


Here are a few of my other favorite cards.

I love this card for two reasons...it allows me to include 2 photos and the design is spot on with the strand of lights since Sam is holding his own lights in his photo. Love that expression on his face! 
This card couldn't be more perfect! Sam is growing and changing so much lately, and he is definitely getting into things that he shouldn't be every chance he gets! I don't think he is quite old enough to be on Santa's naughty list though, do you?


Minted offers so many great features for customizing your holiday cards. You can have photos on the front and back, choose from a variety of envelope selections and even have a decorative slip liner in your envelope to match the theme of your card. Their site is so user friendly and allows you to maneuver from one page to the next with ease. An awesome feature they offer is the Find it Fast. If you are in a rush and don't have a lot of time to upload the same photo over and over into a bunch of different card options this is your solution. Using this feature all you have to do is upload your photo one time and it automatically places the photo in all of the available card layouts so you can view them at the same time. So simple, easy and brilliant! Here's a peak at our little Sam in an assortment of cards.


One of my favorite categories they offer is Baby's First Christmas. How could you not adore a Christmas card with a sweet sleeping little baby on the front. So many adorable options to choose from.


Not only does Minted offer holiday cards, but they have wedding invitations and save the dates, birth announcements, business stationery and even party decor themes. They truly are a one-stop shop for all your paper needs throughout the year. They offer truly original designs on thick luxurious paper. So if you are looking for the perfect holiday card you will definitely want to check out all the fun options that Minted has to offer.

I can't wait for our holiday cards to come! Stay tuned and I will reveal the card we picked once they arrive!

Related Posts with Thumbnails