Showing posts with label candy. Show all posts

Friday, October 12, 2012

Chocolate & Peanut Butter Cupcakes with Halloween Candy Bark


Halloween is quickly approaching, so you know what that means...it's time to stock up on candy! There are a few Halloween candy staples that I must keep in my stash the entire month of October, which include Reese Pieces, Reese Cups, Peanut M&Ms and Butterfinger! YUM! As you can see the common theme with all these candies seems to be peanuts & peanut butter! So I had the idea to create a fabulous Halloween Candy bark to use a decoration on top of some chocolate and peanut butter cupcakes! This recipe was definitely created for all you chocolate and peanut butter lovers out there!

I love the pops or orange and yellow in the Halloween bark! I'm sharing the recipe for the cupcakes, candy bark and even a super cute way to individually package up these cupcakes for all your trick-or-treaters over at Half Baked!  So head on over and check it out! Definitely look around a bit while you are there too and drool over her fabulous Fresh Apple Donuts!

I've got a few more candy themed recipe ideas up my sleeve, so check back soon! What's your favorite Halloween Candy!

Happy Friday!

Friday, December 2, 2011

Hot Chocolate Cupcakes with Peppermint Buttercream

It's the most wonderful time of the year! This is my absolute favorite month to bake! Cookies, candies, pies and cakes are all on my baking to do list this holiday season! To start things off I've creates a new recipe for Hot Chocolate Cupcakes with Peppermint Buttercream! This quite possibly is one of my all time favorite cupcakes!

Chocolate and Peppermint are an amazing flavor combination. Topped off with some homemade peppermint bark, these cupcakes are sure to be one festive treat at your holiday party this year! I will certainly be making them again to share with family and friends in the coming weeks.

Head on over to Half Baked for the cupcake and peppermint bark recipes! Wishing you all a wonderful holiday filled will all sorts of yummy sweets!

Thursday, October 6, 2011

Apple Cupcakes with Caramel Buttercream

We are getting in the Halloween spirit here at CIS. Several bags of candy has already been purchased...Snickers, Reese Cups, candy corn and one of my all time favorites Caramel Apple Pops! If you haven't tried those green apple lollipops covered in a shell of caramel you are missing out. They are the perfect combination of sour and sweet! In my book apples and caramel go hand in hand this time of year, so I've created a special treat that you are sure to enjoy, Caramel Apple Cupcakes!

If you are planning a Halloween party this year, these Caramel Apple Cupcakes with assorted toppings are a must have on your dessert spread. Hop on over to Half Baked for the recipe! And while you're there check out some of their other adorable ideas for decorating Halloween sweets here, here and here.

Happy October!

Friday, October 1, 2010

Cupcake a Week: Pumpkin Skewers

Happy October 1st! I can't believe it's already time to start thinking about pumpkin flavored sweets, Halloween costumes and the crazy amounts of candy that comes along with this month!

To start the month off right I'm excited to share with you another cupcake skewer idea I submitted to the Pizzazzerie contest last week! The winner has been chosen, and although my skewers didn't win, both my Cute as a Button and this Pumpkin Skewer idea were featured on the Pizzazzerie site! Be sure to check out some of the other great submissions over on their website for some Halloween and everyday cupcake skewer inspiration. I was so excited when I saw pictures of my cupcake creations!

For this round of cupcake skewers I made a batch of pumpkin cupcakes with cream cheese frosting.

Then decorated the tops with a signature Fall pumpkin candy! These make cute mini cupcakes, but to make the actual cupcake skewer, before decorating there is an extra step you need to do first. So, as promised from last week's cupcake skewer post, I'm going to show you step-by-step how to put your mini cake on a stick!

First make a batch of mini cupcakes and remove the paper liners. Use a circle cutter that is slightly smaller than the width of your cupcake and press through the center of the cake.

Remove the excess cake from around the edges.

You are now left with a uniform round cupcake shape. Cutting the cupcakes with a small circle cutter ensures that all cupcakes are the same size and removes some of the weight of the cake so it sticks on the skewer better. Trust me, I learned this the hard way by first placing the entire mini cupcake on the skewer, the cake was too heavy and flimsy and the skewer poked right through the top of the cupcake. This was bad, very very bad!

Then add a dollop of icing on top.

Add a pumpkin candy for decoration! This just screams fall to me! These are cute enough to eat, even without the skewer!

Place a wooden skewer in the base of the cupcake and viola!

Since candy corns are a staple candy at pretty much every house around Halloween I thought it would be a fun idea to include it in the presentation for these cupcake skewers. By simply using a glass jar, filling it with candy corn and tying a coordinating ribbon around the outside you have a super cute, easy, affordable and festive DIY display for any Halloween dessert table or party center piece.

I'm looking forward to sharing more fun fall and Halloween treats with you! If you have any exciting baking projects lined up for October I'd love to hear about them!

Happy October!

Sunday, April 4, 2010

Easter Dessert Table


Happy Easter! I hope everyone had a wonderful day with friends and family, and most of all remembered the true meaning for today. It has been a great weekend here in Mobile, filled with a successful fundraiser for the Leukemia and Lymphoma Society, beautiful weather and spending time with my family. My mom, sister and brother-in-law came down to visit from KY so we have been enjoying time together baking Easter goodies, site seeing and eating way too much good food! We enjoyed a delicous Easter brunch at one of the downtown hotels and as if the dessert at the brunch wasn't enough for us, we came home and ate even more sweets from this Easter dessert table I created!


I just love the whole idea of dessert tables. They are such a fun way to display a variety of sweet indulgences that can be the center piece of any party! I have been running around trying to get some of my families favorite Easter treats so that I would have something for everyone on the dessert spread.


PEEPS...I am not a huge fan of this super sugary marshmallow candy, but they are one of my mom's favorites! She loves to let them get stale first and then eat them.


SUGAR COOKIES...these are for my sister, Emily! I have been making this sugar cookie and royal icing recipe for the past few months now for various occassions and posting pictures of them on my blog. And everytime I post a new sugar cookie she asks "when are you going to make some cookies for me". Well since we live 11 hours away from each other it is kind of hard to make cookies for her. So I figured we could make and deocrate a batch together while she was here this weekend. She really enjoyed being able to get creative with different colors of icing and creating unique Easter egg designs.


The plastic multi-color Easter eggs are a must have at any Easter celebration! When I was younger, we would always have an egg hunt at my grandparents house. My grandfather would always fill the eggs with his change, but there would always be a few special eggs filled with dollar bills...and we thought we had struck it rich if we got an egg with a green bill inside! Those were the good ole days! I told my sister I wanted to have an egg hunt in our back yard, but we just didn't get around to it this year!


And it's not Easter without some bunny cookies!


I just love all the pastel candy available this time of year...Plain & Peanut M&Ms, Reese's Pieces eggs and Sweet Tart Jelly Beans. I had picked up these cute martini glasses a few years ago at Target and just love how all the candy looks displayed in them.


CANDY DOTS...these were my brother-in-law Rob's favorite! I had no clue that he would take such a liking to these, but this was the first thing he went for. They just reminded me of my childhood so I couldn't resist picking up a pack of them to add to the table.


I bought everyone Easter baskets and basically told them to "go shopping" from the dessert table to fill up their basket with Easter treats! As you can see I think everyone made out quite well! This is going to be their road trip snacking food for the 725 mile drive home tomorrow! I'm so glad my family could come and visit for the weekend, but the time definitely flew by too fast!

Wednesday, January 6, 2010

Cupcake a Week: Chocolate with Snickers


I hope everyone is off to a great start in 2010! Well as I promised in my Blog Resolutions the other day, I am going to start a new theme on my blog for the new year called "Cupcake a Week". My plan is to try and bake and decorate a wide variety of cupcake recipes this year and share a new idea with you each week. My inspiration for all the cupcakes I post, will be inspired by some of my favorite flavors and ingredients, recipes I haven't tried before but have always wanted too, seasonal or holiday themes, or events that are going on in my life. So get ready to go on a cupcake journey that will last for the next 52 weeks! I'm super excited to see how creative I can get with CUPCAKES! So let's not waste any more time...drum roll please....the first batch of cupcakes for the new year is.............CHOCOLATE with SNICKERS!


Snickers are one of my all time favorite candy bars! My husband had given me a bag of the Snickers Minis in my stocking so I figured why not try and incorporate them into a cupcake recipe. I made the chocolate cupcake batter first and then cut up the Snickers into little chunks and mixed them in the batter. When the cakes baked the Snickers melted, as you can see from the picture above...all of that ooey gooeyness peaking through.


So basically this cupcake is a triple does of chocolate...chocolate cake, chocolate in the Snickers...and you can't forget about adding some chocolate icing on top!


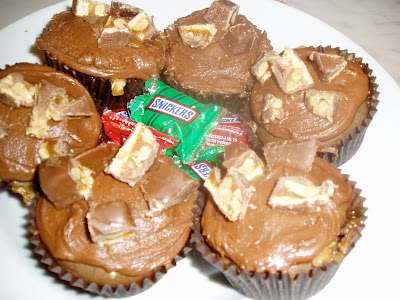
And then crumbling a few more Snickers bits on top of the icing. Simply delicious and a Snicker lovers dream! I only made 6 of these since we are just coming down off a sugar overload from my 24 days of Christmas baking and lets just say I'm trying to get all of those sweets out of my house still. So the last thing I needed was a full batch of 24 cupcakes lingering around for me to eat because I would have eaten every single one of them myself. However, now I am wishing that I would have made more than 6 because these didn't last too long! One of my husband's friends was over for dinner so I wanted to make him a dessert. So the three of us all ate one after dinner...leaving 3 cupcakes left. I sent one away with him when he left...leaving 2, so I'm thinking ok, I'll eat one and Randolph will eat one. However, that is not what happened at all. Randolph eats half of one right before bed...and then next thing I know he is back in the kitchen eating the other half along with the last remaining cupcake. And just like that the cupcakes were gone. Piggy Piggy!

Chocolate Snickers Cupcakes

This recipe makes 6 cupcakes. So just double the ingredients for a dozen.

Ingredients:

Cupcake:
2 tablespoons butter, softened
1/4 cup brown sugar
1 large egg
1/2 cup all-purpose flour
1/4 tsp baking soda
1/8 cup unsweetened cocoa
1/4 cup sour cream

Chocolate Frosting:
2 tablespoons melted butter
1/2 teaspoon vanilla
1 tablespoon cocoa
1 - 2 cups powdered sugar
milk for consistency

  • Preheat the oven to 350 degrees. Put 6 paper liners in cupcake pan.
  • Put the butter, brown sugar, egg, flour, baking soda and cocoa in a large bowl and using a hand held electric mixer, beat together until smooth. Using a spoon, fold in the sour cream. Spoon the batter into the paper liners.
  • Bake the cupcakes for 18 minutes.
  • To make the frosting, melt the butter in a saucepan on low heat. Stir in vanilla, cocoa and powdered sugar. Add milk until you reach desired consistency.
HINT FOR NEXT WEEK'S CUPCAKE...let's just say I'm heading to Disney World tomorrow for the weekend to coach the Alabama Team in Training participants in the half and full marathons on Saturday & Sunday! Disney is a pretty magical place with lots of fun characters roaming around...I'm envisioning some pretty cute cupcakes for next week. Have a guess of what you think they could be, leave me a comment below and we shall see if you are right when I return from my trip!

ENJOY!

Friday, December 25, 2009

Merry Christmas! - Gingerbread House


Merry Christmas! I hope everyone has had a wonderful day celebrating with family and friends and remembering the true meaning for the season! Thanks to all of you for checking out my blog the last 24 days as I counted down to Christmas with some holiday goodies. Maybe you even tried out some of my recipes for your holiday parties! Today, was not about baking for the blog (although I did make another one of those Peppermint Cakes to take to Christmas at my dad's side tomorrow) but it was about getting to have some fun and decorate a Gingerbread House with my sister!


I bought one of those pre-made Wilton gingerbread kits from Michaels and brought home so my sister, Emily and I could act like we were kids again and get creative. The kit came with the pieces of the gingerbread house already cut and ready to assemble, the icing mix and an assortment of candy to decorate.


Here's a picture of me and Emily with our finished gingerbread masterpiece!


Pictures of our gingerbread making process....


Emily was in charge of piping on most of the icing...she did a pretty good job considering she had never used a piping bag before! Maybe I could use her help as my cake decorating assistant...too bad we live so far away!


The back of our house.


Side view.

Now the question is what to do with the gingerbread house...eat it, keep it as decoration for a few days, or take it to our next Christmas party tomorrow!

Wednesday, December 16, 2009

Countdown to Christmas Day 16: Candy Wreaths


Happy Dec 16th! Today's holiday treat doesn't require any baking what so ever but it does require a little bit of patience! Candy Wreaths are a super cute and fun way to decorate your house for the holidays and enjoy a sweet treat at the same time...you can't help but peel the candy off the wreath one by one and eat a piece, or two, or maybe three everyday. After all, these wreaths are made to be enjoyed too not just for looks.

I first discovered candy wreaths when I was a little kid. My cousin Betsy would get a candy wreath every year at Christmas time with all kinds of assorted candy on it and I thought it was the coolest thing. My favorite candy to eat off the wreath were the Brach's Nougat...which are basically a soft round taffy like peppermint that is red & white striped with a green Christmas tree in the middle. Those candies just melted in your mouth, they were so good!

Last year I wanted to see if I could make my own homemade candy wreaths so I started to do some research online to see how they were made. Sure enough, I came across a YouTube video of a lady demonstrating making a wreath. For step by step instructions to make your own wreath check out this video. All you need are a few simple materials that you should have around your house and your favorite type of candy.

I made 6 different varieties of wreaths that you can see from the photos below and they all turned out so cute! I sold some in a fundraiser and gave away some to friends and family.


Starlight Peppermint Wreath


Brach's Nougat Wreath (This is my FAVORITE!)


Jolly Wrancher Wreath


Chocolate Tootsie Roll Wreath


Assorted Candy Wreath (cinnamon, butterscotch, peppermint, jolly rancher, smarties)


Super Bubble Gum Wreath

This is a super fun and easy holiday craft that your kids can even help you make. Candy Wreaths make great presents for teacher's classrooms, holiday decorating, or giving as a present!

ENJOY!
Related Posts with Thumbnails