Showing posts with label orange. Show all posts
Showing posts with label orange. Show all posts
Thursday, May 9, 2013
Creamsicle Cupcakes
Whether we want to admit it or not, this year is just zipping right on by and summer is just around the corner. Living in the south we definitely get a head start on the warmer temps which I love! Although it hasn't gotten too hot just yet, the ice cream man has already been cruising through our neighborhood for well over a month now leaving me to think only about popsicles every time I hear his musical truck!
I'm sure you've all had a creamsicle at least once in your life right? Well today I'm taking this popular orange cream filled popsicle and transforming it into a cupcake! The recipe for these Creamsicle Cupcakes and step-by-step photos for assembly are over at The Cake Blog. These cupcakes are bursting with orange and citrus flavors and are definitely a must try this summer!
I found this adorable orange polka dot and stripe decorative tape at Michael's and made these cupcake toppers in just a few minutes using some toothpicks! Such a quick, easy and cheap way to add a little something special.
Hope you enjoy this recipe! And for all you moms out there I hope you have a wonderful Mother's Day weekend!
Monday, February 4, 2013
Sam's Nursery
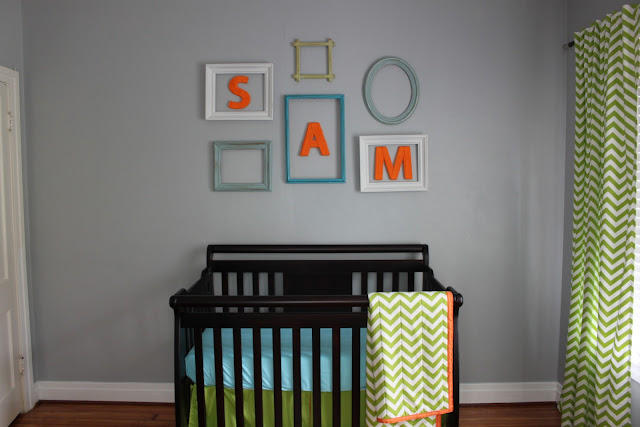
I have been getting a lot of emails lately from expecting moms about Sam's Nursery that was featured on Baby Lifestyles last year. So I figured I would go ahead and do a non-baking related post today and instead showcase my little boys nursery and all the details that go along with it! This is honestly my absolute favorite room in our house. The fun patterns and bright colors bring me so much joy and definitely bring a smile to Sam's face every time he is in his room! I can't believe he will be ONE at the end of March. Boy how time sure does fly.
I hope you enjoy the pictures of Sam's lime, turquoise and orange nursery! It truly is a mix of old and new pieces, with a modern twist and I just love how everything came together. My goal was to create a room that reflected both mine and Randolph's personalities. I wanted a unique space, something that felt like it was created with lots of love and DIY projects. Since we live in the south and Randolph LOVES to be on the water..he will fish and go crabbing any free chance he can get I wanted to add a small touch of things that Randolph loves to do and can't wait to share with Sam some day in his room. So the crab accents in the picture frames and pillow and the fishing pole lamp turned out to be absolutely perfect.
A detailed list of all the sources with links is provided at the bottom.


Paint Color: Polished Sliver by Valspar from Lowe's
Glider & Ottoman: Siegel's Baby Room
Crib: Siegel's Baby Room
Dresser/Changing Table: Charles Phillips Antiques, custom painted by Audrey Phillips Paint and Design
Side Table: Cotton City Antique Mall, Mobile AL
Wall Frames: found at 2 local antique stores - Midtown Antiques & Cotton City Antique Mall, Mobile AL
Yarn Letters: DIY Project - bought the wood letters at Hobby Lobby and orange yarn from Michael's
Fabric: Carousel Designs
Curtains: Handmade by my step-mom (Lime & White Zig Zag Fabric)
Crib Skirt: Handmade by my step-mom (Lime & White Zig Zag, Lime Organic and Tangerine Fabric)
Quilt: Handmade by my dad (Lime & White Zig Zag and Tangerine and White Minky Chenille Fabric)
Pillows: Handmade by my step-mom (Aqua & White Zig Zag, Aqua Organic and Tangerine Fabric)
Toy Basket: liner was handmade by my step-mom (Aqua & White Zig Zag)
Fishing Pole Lamp: Gift from my step-mom, she bought the lamp at Hobby Lobby and then covered the existing plaid shade in aqua fabric to match the nursery
Baby Age Blocks: Montana Vintage Greens on etsy
ABC Print: Trendy Peas on etsy (size 16 x 20), bought the wood frame from Hobby Lobby and had the print matted in the frame at Michael's
Crab Art: DIY Project - had the white Pottery Barn Frames from our wedding, bought the wooden crabs and orange paint from Michael's
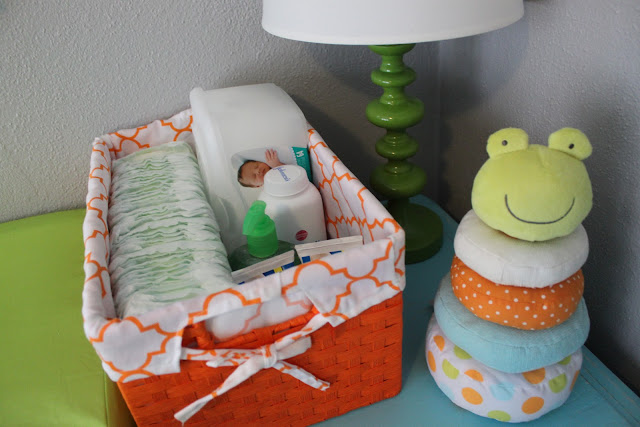
Diaper Caddy: Michael's
Green Lamp: Target
Plush Stacking Toy & Striped/Polka dot Plush Dog: gifts from Auntie Em
Hope you all enjoyed a peak into little Sam's nursery!
Wednesday, June 1, 2011
Mixed Fruit Popsicles
 There is only one word to describe the weather in Mobile lately....H - O - T !!!!! I thought Memorial Day weekend was hot with the temperatures reaching 97 degrees but today things only got hotter...we hit 100 degrees...that's right 100! Don't believe me, I have proof on my iphone from about 4:30ish this afternoon! It looks like summer is here to stay!
 So to keep cool on those blistering hot days I have created some homemade fruit popsicles! Making popsicles is super easy, only requires a few ingredients, and they are delicious and healthy! Let's just say these are going to be a staple in my freezer for the next few months! If you are looking for that perfect sweet to take to a summer picnic, birthday party or family reunion a homemade fruit pop is the way to go...they are no fuss, can be made days in advance, and don't require any baking just a large bowl and a spoon to mix with!
 To make homemade popsicles you only need 3 things:
-3 oz Dixie paper cups
-wooden popsicle sticks
-fruit/juice combination of your choicce
 One of my all time favorite frozen treats is frozen lemonade so I knew for sure lemons were going to be an ingredient in my pops. I decided to pair lemons with some pureed strawberries to create a Strawberry Lemon popsicle! At first glance you think you are just going to be tasting strawberries but one lick on this pink pop and the tang of the lemon hits your tongue, yum the ultimate summer flavor!
After talking to my mom and telling her my plan to make homemade popsicles to take to our friends Memorial Day party she told me how her mom (my grandmother) used to make popsicles all the time using bananas, pineapple and orange juice. Since I happened to have all 3 of those fruits on hand I figured I would go ahead and make a second pop flavor, Banana Pineapple Orange. I really enjoyed these flavors and the texture of the crushed fruit reminded me of eating a frozen fruit bar you would normally find at the grocery store!
Both flavors were delicious and very refreshing, but I think my favorite was the Strawberry Lemon. I just love the tartness from a lemon!
 Strawberry Lemon Popsicles (makes 18)
-2 cups water
-1 cup sugar
-4 cups strawberries, sliced then pureed
-4 lemons, juiced
-18 Dixie paper cups (3 oz)
-18 popsicle sticks
- Mix water and sugar in small pan on the stove over medium heat stirring until sugar is dissolved to create a simple syrup. Place syrup in refrigerator to cool.
- Slice strawberries and place 4 cups of berries into food processor to puree.
- Mix the simple syrup, strawberry puree and the juice from 4 lemons into a bowl and stir until combined.
- Place paper cups onto a baking sheet so easy to transport pops to the freezer.
- Pour fruit mixture into paper cups, filling about 3/4 full.
- Place a popsicle stick in the center of each cup and place pops into the freezer.
- Chill for 4 hours.
- Gently peel away paper cup from popsicle and enjoy!
-2 bananas, mashed
-1 (20 oz) can crushed pineapple in juice
-2 cups orange juice
-18 Dixie paper cups (3 oz)
-18 popsicle sticks
- In a large bowl mash bananas. Add can of crushed pineapple and orange juice and stir until combined.
- Place paper cups onto a baking sheet so easy to transport pops to the freezer.
- Pour fruit mixture into paper cups, filling about 3/4 full.
- Place a popsicle stick in the center of each cup and place pops into the freezer.
- Chill for 4 hours.
- Gently peel away paper cup from popsicle and enjoy!
The possibilities are endless with these fruit pops, just pick your favorite fruits and juices and start combining flavors! I'd love to hear what flavor pops you would make! I'm envisioning something with blueberries and raspberries next!
Stay cool this summer!
Subscribe to:
Posts (Atom)


