Tuesday, May 31, 2011

Monkey Business

This weekend my childhood friend McKensy's son celebrated his 1st birthday! Although I was not able to attend the party since we live in different states, I of course wanted to participate somehow so I offered to make and send some cookies for his special day! The theme was monkeys which I thought was adorable! I just love the invitation that McKensy created with pics of Barrett and his stuffed monkey! Using the colors from the invite created some personalized cookies to spell out his name.

I just had a feeling these cookies were going to turn out super cute, so I captured step-by-step photos so you can see how to create these little monkeys! So let's get down to business shall we...

You will need:
-monkey cookie cutter (I used Wilton brand found at my local craft store)
-sugar cookie recipe
-royal icing (tinted light brown, dark brown, pink, black)
-decorating tips: #2 for light brown, dark brown, pink, #1 for black)
-2 squeeze bottles for flooding icing


1.Using piping bag with tip #2 light brown icing, pipe an oval outline for the monkey face.

2.Using piping bag with tip #2 dark brown icing, outline the shape of the monkey and create outlines for the ears.

3.Using piping bag with tip #2 pink icing, fill in the monkey ears.

4.Once all the monkeys are outlined in brown it is time to go back in and "flood" the cookies with a thinned down version of royal icing using squeeze bottles. Allow the outlines to dry for about 30 minutes before flooding.

5.Using the flooding consistency light brown icing in the bottle, squeeze some icing in a zig zag inside the monkey face and the icing will start to spread.

6.Using the tip of the squeeze bottle gently move the icing to fill in the entire shape of the face.

7.Using the flooding consistency dark brown icing in the bottle, squeeze some icing in a zig zag inside the monkey head and the icing will start to spread.

8.Using the tip of the squeeze bottle gently move the icing to fill in the entire shape of the head.

9.Using the piping bag with tip #1 black icing, pipe on the eyes, nose and mouth. Wait about 1-2 hours before you go back and pipe on the face so it doesn't bleed into the wet icing.

10.Allow flooded cookies to dry 24 hours before stacking or packaging.

And since every monkey needs a banana, I couldn't resist I had to make a few bananas too!


McKensy went all out for Barrett's birthday by making some monkey cake pops, mini cupcakes and a jumbo cupcake! Everything turned out super cute from the pictures I have seen and the birthday boy seemed very happy enjoying his sweets!

Happy 1st Birthday Barrett!

Thursday, May 26, 2011

Chocolate Chip Whoopie Pies

It's a cake, it's a cookie...it's an amazingly yummy Chocolate Chip Whoopie! Let me just start this post by saying, you might as well run to your pantry right now and grab that bag of chocolate chips you have on hand. You know, the bag you keep just in case you get that craving for some chocolate chip cookies in the middle of the week! Doesn't everyone at least keep 1 bag of chocolate chips on hand in case of dire emergencies of cookie cravings, or is that just me? At any given time I have at least 2-3 bags of chips on standby just in case I get that cookie dough craving! I will admit, I am a lover of raw cookie dough by the spoonfuls! So now that you know I have a stockpile of chocolate chips and eat dough with raw eggs...well just go grab your chocolate chips because you are going to want to make this recipe immediately...I'll wait for you to return.


Got your chips? Ok well let's get started. If you have never tried a whoopie pie, well you have been missing out. These are simply some of the most delicious little sandwich sweets I have ever tasted. A whoopie pie resembles both a cake and a cookie and is assembled with some type of filling in between. Whoopie pies are all the rage right now and you can be sure to find some amazing flavor combinations in this popular book Whoopie Pies. There are your standard flavors like the Chocolate, Vanilla or Pumpkin whoopies for those who like traditional flavors. And for those of you who have a little more adventurous palete there are Pistachio-Cardamon or Jalapeno Cornbread whoopies to name a few.

But today we are going to focus on the ever popular Chocolate Chip Whoopie pie! For all you chocolate chip cookie lovers out there, I guarantee that once you sink your teeth into one of these babies you won't want to eat just 1 cookie ever again, but will forever want your cookies sandwiched with a sweet filling in between! These cookies baked up absolutely perfect, so soft and delicate and paired nicely with my favorite vanilla buttercream. I whipped up a batch of these when we had some friends over for dinner and everyone ate at least two whoopies and took some home to! I know it's hard to compete with a layer cake, but these are definitely at the top of my list of all time favorite sweet indulgences!


Chocolate Chip Whoopie (from Whoopie Pies)

Ingredients:
-2 1/4 cups all-purpose flour
-1 1/2 teaspoons baking powder
-1/2 teaspoon salt
-4 tablespoons unsalted butter, room temperature
-4 tablespoons vegetable shortening
-1/2 cup granulated sugar
-1/2 cup (packed) brown sugar
-2 large eggs
-1/2 cup buttermilk
-2 tablespoons milk
-1 teaspoon baking soda
-1 teaspoon white vinegar
-1/2 teaspoon vanilla extract
-1 cup mini chocolate chips

  • Position rack in the center of the oven and preheat the oven to 375 degrees. Line two baking sheets with parchment paper.
  • Sift together the flour, baking powder, and salt onto a sheet of waxed paper.
  • In the work bowl of stand mixer fitted with the paddle attachment, beat together the butter, shortening, and both sugars and beat until light and creamy, about 3 minutes. Add the eggs and the buttermilk and beat until combined.
  • In a measuring cup, combine the milk, baking soda, and vinegar. Add the milk mixture to the batter along with the flour mixture and beat on low until just combined. Add the vanilla and beat on medium for about 2 minutes, until completely combined.
  • Using a wooden spoon, stir in the chocolate chips until just incorporated.
  • Using a spoon, drop about 1 tablespoon of batter onto one of the prepared baking sheets and repeat, spacing them at least 2 inches apart. Bake one sheet at a time for about 10 minutes each, or until the cakes begin to brown. Remove from the oven and let the cakes cool on the sheet for at least 5 minutes before transferring them to a rack to cool completely.
  • Makes about 48 two-inch cakes. (Total 24 whoopie pies)
  • The book pairs this whoopie recipe with a Marshmallow Filling but I opted to use my vanilla buttercream recipe instead!
  • Fill each whoopie with a spoonful of vanilla buttercream.

Vanilla Buttercream
(this is my go to recipe!)
-2 sticks unsalted butter, softened
-6 cups confectioner's sugar
-1/4 cup milk
-1 tsp vanilla extract

  • Cream butter in the bowl of a stand mixer.
  • Gradually add confectioner's sugar and milk, mixing well after each addition
  • Mix in vanilla extract.
  • Add in more milk as necessary to reach desired consistency.
I hope you all enjoy these whoopies as much as I did! What are some of your favorite whoopie pie flavors?

Sunday, May 22, 2011

Purple Polka Dots


This weekend my neighbor Olivia turned the big "3". For her birthday she wanted a chocolate cake with purple icing and polka dots! I must say this is one easy to please 3 year old! At first I was playing around with the idea of adding various shades of purple polka dots using fondant. In the end I decided to stick with good ole' buttercream frosting for decorating the cake. I am loving how the cake turned out and so glad I decided to stick with the same shade of purple, its clean and simple!

To add a touch of contrast I decided to personalize the cake using a deeper shade of purple and cut out some fondant letters using this alphabet cutter set.

I delivered the cake to Olivia and what do you know she was wearing an outfit in the exact same shade of purple, it was too cute! Wish I would have gotten her picture!


Here's a picture of sweet Olivia taken about a month ago enjoying one of my cake pops! She sure was holding on to this pop super tight, as only minutes sooner our black lab Tillman had snatched another pop right out of her hand! Olivia is a huge fan of my baked goods! Almost every time I see her she asks "do you have any cupcakes?"...too cute! Or if she isn't asking for sweets she is asking "is my boyfriend home?"...let's just say she is trying to steal my husband. She thinks Randolph is her boyfriend and it is the cutest thing I have ever seen. Anytime she sees him she gets this huge smile on her face and gets all shy! She has a crush!

Happy Birthday Olivia!

Wednesday, May 18, 2011

Chocolate, Caramel, Peanut Butter Heaven


I saw this cake a month or so ago on Sprinkle Bakes, one of my favorite blogs and my jaw dropped in awe of the complexity, the beauty, the ingredients and just the overall WOW factor of this cake. I mean the cake is absolutely gorgeous on the outside garnished with the chocolate curls, but then you cut into the cake and a whole new world is waiting for you...there's chocolate cake, peanut butter cups, caramel, nuts and cheesecake. Holy Cow this is my kind of dessert!

These are all of my favorite flavor combinations wrapped into one sweet package! I mean look at the caramel oozing out in between the chocolate cake and cheesecake layers...oh and those little brown specs peaking out of the cheesecake, those are peanut butter cups! They are a nice little surprise hidden inside only to be revealed when you take a bite!

Thank you Sprinkle Bakes for creating this AMAZING cake! The moment I laid eyes on your fabulous dessert I just knew I had to try and recreate it. I will flat out admit my cake doesn't even come close to being as perfect as yours was, but I can tell you this it tasted absolutely delicious!

My biggest struggle with the cake was the chocolate curls, they gave me fits! I think my very first piece of chocolate curled and then all the rest just ended up as chocolate shavings. Your video makes it look way too easy! I am definitely going to have to have another go at making chocolate curls one day but the heat and humidity hear in Mobile this time of year is tricky with chocolate.

I made this cake for a very special occasion and for a couple who loves all things chocolate and peanut butter! My good friend Katie is getting married soon and some of our friends recently threw them a crawfish boil couples shower! Of course I volunteered to bring the dessert and I knew this cake would be the perfect treat and something that no one had ever tried before.

Katie & Derek. Aren't they the cutest couple!

How sweet, feeding each other the cake for practice on their wedding day!

There is just one word to describe this cake....HEAVEN! Ooey gooey, caramely, chocolatey, peanutty, heaven!

I must admit this cake did require a lot of time, patience, ingredients and dirty dishes but it was absolutely worth it once you sink your teeth into a slice! It received rave reviews and there were literally only crumbs remaining after everyone kept going back for 2nds and 3rds.

If you want to be so adventurous to make this Peanut Butter Cup Chocolate Cake Cheesecake you can find out all the details here. This pretty much walks you through everything step-by-step with the recipes for each layer of the cake, photos for each step of assembling the cake and even a how to video on making the chocolate curls (which I WILL master one of these days!) So what are you waiting for hop on over to Sprinkle Bakes and check out the most divine, decadent and delicious cake I have ever tasted in my entire life! And while you are over there, stick around and check out some of her other fabulous recipes. She creates desserts unlike anything I have ever seen before and her photos are absolutely gorgeous! If only I could spend a day in her kitchen learning some of her baking secrets!

Hope you decide to give this cake a try, you won't be disappointed!

Monday, May 16, 2011

Trucks & Turtles


One of my friend's and repeat customers asked me if I could bake something for both her son and daughter last week. It was her son's birthday and she wanted some red dump truck cookies for him to take to school and share with his friends. Last year I got to make a birthday sweet for him too, do you remember this John Deere cake?

I love getting the opportunity to bake year after year for the same kids. It's fun to see how their interests change over the course of the year and what the hot new toy trend is as they grow up.

Hope you had a great birthday Matthew!


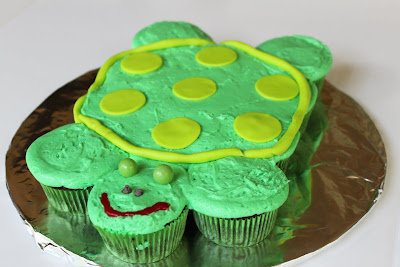
I made this turtle pull apart cupcake cake for Matthew's older sister Alex for her Save the Turtle cakewalk at school.

This turtle cake was made using 12 cupcakes and would be such a fun project for kids.

-To create the body of the turtle place one cupcake down and then surround it with 6 cupcakes to create a circle.
-Then place 2 cupcakes at the back of the circle for the legs and 2 cupcakes at the front of the circle for the arms.
-Place the final cupcake at the top of the circle in between the arms for the head.
-Frost all cupcakes using green icing.
-To create the shell use some lime green tinted fondant (or whatever color you prefer). Cut out circles to place in the center of each cupcake that make up the body of the turtle. Roll out a long rope of fondant and gently place around the edge of the turtle body to create the border of the shell.
-Add some candy eyes, nose and mouth for facial features.

Hope you enjoy these two sweet treats!

Sunday, May 8, 2011

Hilary Duff Inspired Wedding Cake

Remember back in October when I posted about being asked to make this wedding cake? Well yesterday was the big day, and I am pleased to say that I successfully made, delivered and assembled the bride's wish for a Hilary Duff inspired wedding cake.

So what do you think of this side by side comparison? Did I pull it off?

Structurally the cakes were both constructed of 3 tiers each being 3-layers with only icing in between each layer. Hilary's cake was a yellow cake while this bride's cake was a carrot cake, which is why the cake appears slightly darker.

The mother of the bride ordered 125 ivory roses and arranged all the flowers in between the tiers as I assembled the cake. I love how she added some green moss to give the cake a more rustic look.

While assembling the cake, Kelly the bride stopped by and I got to snap a quick picture of her with the cake. Isn't she gorgeous! I absolutely LOVE her ivory sweetheart wedding dress with layer after layer of sheer fabric. Simply stunning!

The cake was constructed of a 14" bottom tier, 10" middle tier and 6" top tier.

I must admit I really like the look of this cake with minimal frosting. The simple and natural look really fit perfectly with the entire rustic theme of the wedding.

In addition to the cake, I made some red velvet cupcakes by special request from Kelly as a surprise for her groom Kyle.

Half the cupcakes were made into a giant pull-apart cake shaped like the UNC Tarheel as Kyle is a recent grad.

The remaining cupcakes were placed on wood stumps to fit in with the decor of the day.

As a fun treat on the cupcake table, the mother of the bride found a lawyer's scale at an antique shop and had me make a cupcake representing both the bride and groom's college. The only request was that Kelly's "Georgia" cupcake weigh just a little bit more than Kyle's cupcake, so I added an extra dollop of icing to tip the scale in her favor!

Here's a peak behind the scenes of me piping some extra icing around the perimeter of the cake as it's being assembled.

This cake would not exist without this amazing cake stand. This is a one of a kind, custom made wood stand designed specifically for this cake! As I was doing a trial run with the carrot cake I realized that this was a dense cake and very heavy. I knew the commonly used plastic separator plates and pillars were not going to be enough to support the weight of this cake. Luckily one of my friend's dad does wood working and created this structure for me. Each tier is removable by spinning the wood plate that fits securely into the center pole. I will definitely be using this stand for future cakes and even cupcakes. Thank you Mr. Abreo you are so talented!

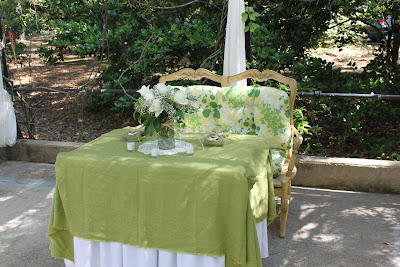
Here are a few pictures I took of the wedding and reception location, the Malbis Center in Daphne, AL while onsite assembling the cake. The mother of the bride and bride are two very artistic ladies and they did all of the decorations. I was so impressed with how gorgeous everything turned out.


They happy couple!


Congratulations Kelly & Kyle! I wish you all of the best in your new life together!

Also, special thanks to my amazing friends Katie and Jennifer who drove the "Cake Car" for this HUGE delivery and helped me get things set up! You all are the greatest!
Related Posts with Thumbnails