Sunday, March 27, 2011

Early Arrival

What could be cuter than a batch of onesie, chick, bootie and bib sugar cookies...the newborn baby itself right? Well that is exactly what happened yesterday. The shower was held for my friend Andrea's sister, Allison in the early afternoon. Right afterward Allison was rushed to the hospital anticipating the early arrival of her little boy Preston. A few short hours later Preston had arrived almost 4 weeks early! Mom & baby are doing just fine though and I've already seen a picture and he is absolutely precious! Talk about a special delivery on the day of your baby shower!

Decorating baby shower cookies are always so much fun. Andrea sent me the link to the baby shower invite and I used the colors of pale blue, green and yellow for inspiration when coming up with the cookie designs. The invitation had a clothesline of onesies, bibs and booties and then a sweet little chick so I knew I wanted to translate each of those baby items into cookies.

I thought it would be a cute idea to include a few monogram "P" cookies as well using a scalloped cookie cutter.

I used my favorite sugar cookie recipe. The only change I made was substituting the vanilla and almond extracts with vanilla bean paste instead...YUM! I love those little black bits of vanilla bean that you can see in the cookie.

The little chicks were my favorite cookies to decorate. The invite had them with colored wings so I decided to mimic that in the cookie decorating, and I love how the blue and green add a pop of color to the yellow body.

Congratulations to the proud parents Allison and Bob to their newest addition little Preston!

Wednesday, March 23, 2011

Strawberry Cupcakes with Strawberry Buttercream

I am loving this gorgeous spring weather we are having here in Mobile...it's almost on the verge of summer and it's only March! There is nothing that goes better with these warm temperatures and bright sunshine than some fresh berries! I found some gigantic strawberries this weekend at the store, I mean huge....like 4 berries combined to make 1 monster berry! Although these berries are perfectly delicious and sweet all on their own I knew they would be even better made into some Strawberry Cupcakes with Strawberry Buttercream swirled on top.

These cupcakes pack a triple punch of strawberry. There is fresh strawberry puree in the batter and in the buttercream. And for a special touch and a slight hint of pick in the frosting I added some strawberry extract which really enhances the flavor! These cupcakes are light and moist and truly the perfect treat for an afternoon spent with friends.


I just got some fun decorating tools from Layer Cake Shop a few days ago so I was excited to try them out on the cupcakes. Since a girl can't have enough piping tips, I bought the French decorating tip for piping on the frosting and the Daisy Flower Plunger to make these adorable little fondant toppers. If you have never been to the Layer Cake Shop site, go check them out now for all kinds of amazing baking products! Their cupcake liners and sprinkle selection comes in every color imaginable...I'll take 1 of each please!


Strawberry Cupcakes with Strawberry Buttercream
makes 12 cupcakes

Ingredients
For the cupcakes:
-3/4 cup cake flour
-3/4 cup all-purpose flour
-1 tsp baking powder
-1/4 tsp salt
-1 stick unsalted butter, softened
-1 cup granulated sugar
-3 eggs (1 whole, 2 whites stiffly beaten)
-1/4 cup milk
-1 tsp vanilla extract
-1 cup fresh strawberries, pureed (1/3 cup puree for cupcakes, 3 Tbsp for buttercream)

  • Preheat oven to 350 degrees. Line cupcake pan with 12 paper liners.
  • In medium bowl combine flours, baking powder and salt.
  • In bowl of electric mixer beat butter and sugar on medium speed until creamy.
  • Add 1 egg and beat until combined.
  • Combine milk, vanilla and strawberry puree in small bowl.
  • Gradually add in flour mixture and strawberry mixture alternately, scraping down bowl after each addition.
  • In a small bowl beat 2 egg whites on medium speed until stiff peaks form. Gently fold egg whites into cupcake batter.
  • Spoon batter evenly into prepared pans about 2/3 full.
  • Bake for 16-18 minutes until toothpick inserted in center comes out clean.
  • Allow to cool on wire racks.
  • Frost with Strawberry Buttercream.
Strawberry Buttercream
-2 sticks unsalted butter, room temperature
-4 cups confectioners' sugar
-3 Tbsp strawberry puree
-1/2 tsp strawberry extract
  • In bowl of electric mixer beat butter until creamy.
  • Gradually add confectioners' sugar and continue to mix.
  • Add strawberry puree and strawberry extract and mix well.
  • Transfer icing to piping bag fitted with French decorating tip and swirl onto cupcakes.
Wishing you all a sweet spring!

Tuesday, March 15, 2011

Cupcakes + Cookies = Flower Pots

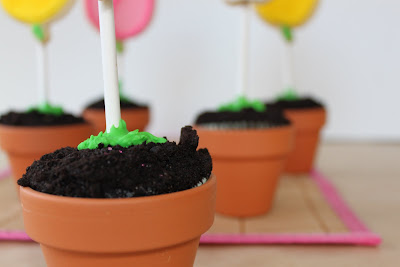
Although Spring does not officially start until this Sunday, here in Mobile we are already enjoying sunny days, temps in the 70s and flowers in bloom all over town! So to welcome this amazing Spring weather, how about some flower pot cupcakes and cookies!

I will be the first to admit that I don't quite have a green thumb when it comes to keeping a beautiful garden full of vibrant flowers ever year. I am the person that goes and spends a ton of money on flowers, plant them in my flower box, and then forget to water them and they shrivel and die. No water + extreme heat of Mobile = Sad Flowers! So this year, I thought I would take a different approach with flowers, you know the kind that are edible and don't requiring watering. The kind of flower that sprouts out of a chocolate cookie crumbled cupcake!

These flower pot cupcakes just scream spring! They make the perfect addition to any dessert table, would be an adorable party favor at a baby or wedding shower, are the perfect gift for a teacher, or would be the perfect project to assemble with your kids on a sunny day.

Flower Pot Essentials:
Clay Pots + Chocolate Cupcakes + Chocolate Ganache + Oreo cookie crumbs

You can pick up the flower pots at your local craft store. I got these at Michaels for 69 cents each!

Dip the top of the cupcake in the chocolate ganache.

Then dip the chocolate glazed cake into the Oreo crumbs.

Your cupcake now looks like potting soil! Place the cupcake in the flower pot.

Cookie Essentials:
Flower Sugar Cookies + Royal Icing & Sprinkles + Cookie Sticks

Now I bet you are wondering how the flowers are going to sprout out of the cupcakes. This is where the cookie stick comes into play. The same cookie stick that I forgot to place behind all of my cookies prior to baking...ooops! I was a little too excited to see how this idea would come together, that I completely overlooked probably the most important detail on how the cupcake and cookie would interact with each other. So please please please when you make these, be sure to add the cookie stick to the cookie prior to baking. You can find the sticks at your local craft store.

As you can see from the picture I did manage a sneaky trick to get these cookies to attach to the sticks! You can use some royal icing left over from cookie decorating to secure the stick in place. Just allow the icing to dry overnight before you try and place the cookie upright in the pot, or else it will fall right off. But my best advice is to just bake the stick in the cookie to start with, you will save yourself lots of trouble and added stress!

Don't these little flower pots just bring a smile to your face? They have brightened up my dining room this week and I love having them as a centerpiece on my table. They are also an amazing mid afternoon snack!


For these cookies I modified my current sugar cookie recipe and added a little more sugar and used vanilla bean paste instead of vanilla & almond extracts. Oh my goodness, I absolutely love the results those changes made to the recipe! The little flecks of black vanilla beans in the cookies just make them appear special and more elegant. The texture of these cookies was slightly softer and the sweeter taste just made the cookies melt in your mouth. Randolph highly approved of this recipe too, having already devoured 3 cookies at lunch!

Vanilla Bean Sugar Cookies (makes about 3 dozen)

Ingredients:
-3 cups all-purpose flour
-2 tsp baking powder
-1/4 tsp salt
-1 1/2 cups sugar
-2 sticks unsalted butter, cold, cut into chunks
-1 egg
-1 tsp vanilla bean paste

  • Preheat oven to 350 degrees. Line cookie sheets with parchment paper.
  • Combine the flour, baking powder and salt in bowl and set aside.
  • In the bowl of a mixer cream the sugar and butter well.
  • Add the egg and vanilla bean paste to the butter mixture and mix well.
  • Gradually add the flour mixture, scraping down the bowl as necessary as mixing.
  • Grab a ball of dough and knead it together.
  • Roll dough out onto floured surface and cut into desired shapes.
  • Place cookies on prepared baking sheets and place in the refrigerator for 10 minutes. This will prevent the cookies from spreading when baking.
  • Bake for 10-12 minutes.
  • Allow cookies to cool 5 minutes on cookie sheets then transfer to wire racks to completely cool.
Decorate with Royal Icing.

Here are the other recipes I used for the cupcakes.
Chocolate Cupcakes (cake recipe from I am Baker, one of the most talented cake decorators who always sneaks a little surprise into the middle of her cakes)
Chocolate Ganache Glaze (recipe from Martha Stewart)
15 crushed Oreos for garnish

Hope your Spring is full of lots of beautiful flowers, edible ones of course!

Thursday, March 3, 2011

Mardi Gras "King Cake Inspired" Layer Cake

Mardi Gras has been in full swing here in Mobile for the past few weeks now! I have been to parades, caught strands of beads, nibbled on Moon Pies and even gone to a Mardi Gras Ball. So what better way to add to this celebration than with a "King Cake Inspired" layer cake! I can't believe the carnival season is almost over and I have only eaten one king cake so far this year. In years past it wasn't unlikely for me to devour an entire cake myself in only a few days and run right back out and buy another one. They are just that amazing!

King Cakes are truly one of my favorite indulgences during the year! Last year I even made one from scratch. There is nothing quite like a piece of flaky king cake with a cinnamon and pecan filling covered in an icing glaze and garnished with tri-colored purple, green and gold sprinkles.

A traditional king cake has a cinnamon center, but they also come in a variety of other flavor combinations including apple, strawberry, raspberry, pecan and cream cheese fillings. My all time favorite is the cinnamon pecan. It almost reminds me of a cinnamon roll or a piece of coffee cake! So this weekend as I was happily eating my king cake, the idea popped into my head to create a king cake inspired layer cake. Taking a standard from scratch yellow cake mix I incorporated my favorite cinnamon and pecan flavor into the batter. I created a cinnamon cream cheese filling for inbetween the layers and then frosted the outside with a vanilla buttercream. I am thrilled with how all the components of the cake came together to create a very moist, flavorful and cinnamony (is this a word?) cake! If you like king cakes, you have got to try this recipe!


Mardi Gras "King Cake Inspired" Layer Cake


makes a 3-layer 8-inch round cake

Cake:
-2 cups sugar
-2 sticks unsalted butter, room temperature
-1 1/2 cups cake flour
-1 1/2 cups all-purpose flour
-2 tsp baking powder
-1/2 tsp salt
-1 cup milk
-4 eggs
-1 tsp vanilla

Brown Sugar Cinnamon Mixture:
-1/4 cup brown sugar
-1 tsp cinnamon
-1/2 cup chopped pecans

Cinnamon Cream Cheese Filling:
-8 oz cream cheese, softened
-2 cups confectioners' sugar
-1 tsp cinnamon
-1/4 cup milk

Vanilla Buttercream:
-2 sticks unsalted butter, room temperature
-5 cups confectioners' sugar
-1/4 cup milk
-1/2 tsp vanilla

Directions:
1.Preheat oven to 350 degrees. Line 3 8-inch round cake pans with parchment paper and spray with cooking spray.
2.In bowl combine all dry ingredients: cake flour, all purpose flour, baking powder and salt and set aside.
3.In large bowl of electric mixer beat butter and sugar until combined.
4.Add in eggs one at a time, beating well after each addition. Mix in vanilla.
5.Gradually add flour mixture and milk alternating between dry and wet ingredients and scraping down blow in between additions.
6.Mix brown sugar, cinnamon and pecans into a small bowl for Brown Sugar Cinnamon mixture. Fold in mixture to cake batter.
7.Pour batter into prepared cake pans. Bake for 22-25 minutes or until cakes test done. Allow cakes to cool for 10 minutes in pans. Remove cakes from pans and place on wire racks to cool completely.
8.For the Cinnamon Cream Cheese Filling, combine cream cheese, confectioners' sugar, cinnamon and milk in bowl and beat with mixer until smooth and creamy. Once cake is cool, assemble the cake and spread the mixture inbetween the layers.
9.For the Vanilla Buttercream, beat butter with electric mixer until creamy. Gradually add in confectioners' sugar and milk and continue to mix well. Mix in vanilla. Reserve 1 cup icing to tint desired colors for decorating. Using remaining white icing cover the outside of the cake using an offset spatula.
10.To pipe vertical stripes on the cake use piping bags and small round tips (#3, 5 or 7). Fill bags with desired icing colors and pipe vertical stripes up the sides of the cake starting at the bottom and going to the top edge. Once all vertical stripes have been piped, using the same tip, go around the bottom and top edge of the cake piping round balls to form a strand of beads around the cake.

I hope you will try this King Cake inspired Mardi Gras Cake! You can't go wrong with the cinnamon and cream cheese hidden between each layer!

Happy Mardi Gras!
Related Posts with Thumbnails