Friday, March 26, 2010

Happy Spring - Daisy Cake


Happy Spring! I am loving this change of season with the flowers blooming and the warmer weather. We have been lucky enough to already have a few days with the temps in the 70s, gotta love living in the south! I'm thinking a few more weekends and I'll be heading to the beach...anyone jealous?

I wanted to show you all a spring themed cake I decorated this week. I just finished taking the Wilton Fondant and Gum Paste cake decorating class. For the last class we had to decorate a cake completely covered in fondant and had to include some fondant and gum paste flowers as well, but the design of the cake was open to our own creativity.


In class we learned how to make a daisy flower using gum paste. I just love this flower, it is so simple and can be colored in any color imaginable to go with your cake theme.


I wanted to make daisies in some vibrant orange, pink and purple shades to make them really stand out on my cake. To allow the flowers to dry and keep their shape at the same time I used an egg carton to store them in. The holes were perfect for the shapes of the flowers and kept them cupped together so they would look like they were still in bloom when added to the cake.


Then to give the cake a more modern look I wanted to add two shades of green fondant to suggest the feel of flower stems, but instead have them look more like stripes on the cake. I am really pleased with how well all the colors turned out and how nicely the green shades compliment the bright flowers. This cake just screams SPRING!


I also love polka dots on cakes and think the combination of stripes and dots is so much fun! By taking two different size circle cutters I was able to create mutli-colored polka dot inlays for the cake.


I have used fondant before on cakes, but only for decorative pieces, never completely covered in fondant. I really like how smooth and clean the cake turned out. Playing with fondant is fun...it's like play dough for adults...and I'm definitely looking forward to many more fondant covered cakes!


I think this cake would be perfect as the featured sweet on your spring or Easter dessert tables! Hopefully you can find some inspiration from this daisy cake in your upcoming spring sweets!


Happy Spring!

Thursday, March 25, 2010

Cupcake a Week: Basketballs for March Madness


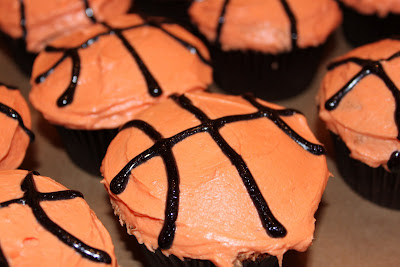
Well it's time for another cupcake idea! Since March Madness is in full swing right now with the Sweet Sixteen games beginning tonight I figured it would be appropriate to share a basketball themed cupcake! I'll be honest with you, these aren't the greatest creation I have ever made. I had big dreams for these cupcakes. I had seen some really cute fondant decorated basketball cupcakes with the rubber looking feel of the ball...they looked so realistic, and also some star tipped decorated ones that resembled the ball texture...but I have do admit, it was getting late last night and I took the easy way out and just iced them using an offset spatula and painted on some black icing lines...you still get the idea of a basketball right?
I even had visions of making cute cupcake toppers with each of the Sweet 16 basketball team logos on them and displaying them all nice and cute...dang time just seemed to slip away from me this week! I guess there will always been next yeat to try and pull some fancier bball cupcakes together! But if any of you are going to be having a party for the Final Four tournament there is still time to get together some cute cupcake toppers, and by then you won't have to make as many for the different team logos either..brilliant!


I've got some super cute spring and Easter themed sweets I've been working on so be sure to check back soon!

Sunday, March 21, 2010

My First Wedding Cake


So here is the big reveal of the mystery baking project I have been working on these last few days...32 sticks of butter, 18 cups of sugar, 28 eggs, 22 cups of flour and 14 POUNDS of confectioners' sugar later...I have successfully baked, decorated and delivered my first wedding cake! WOW this was a huge undertaking that I found out about only 12 days before the wedding.

This cake was for Cammie, she owns our local ice cream shop in Mobile called Old Dutch. She has some of the best ice cream (my fav is pecan praline) and the shop is located just around the corner from our house so we frequent her place quite often. Well two Tuesdays ago, I was at a cake decorating class, but the Team in Training group I run with was at her place for an ice cream birthday party for Isaac, our honored teammate. Event though I couldn't make it to the party, something good came out of it...I got my first wedding cake job! My friend Molly who coordinates the Team in Training program was there and talking to Cammie about her upcoming wedding and they were talking about how she hadn't ordered a wedding cake yet. So Molly, knowing how much I love to bake told her that I could probably help make her cake. So a simple phone call later and I was hired!

I went and met with Cammie the next day and found out what she was looking for:
-a cake for 200 people (WOW! this is going to be big...well bigger than anything I have ever made before!)
-yellow cake with buttercream icing (not worried about this part...I could do this in my sleep)
-simple design with a larger bottom tier and a smaller square tier on top (I've done 1 tiered cake before...here comes cake #2)
-design: touch of black, with a "W" monogram and some flowers

I walked away from the meeting feeling pretty confident that I could handle this cake request. Cammie knew that I am just really getting my feet wet with cake decorating so she was super supportive and made me feel at ease that even if something would go wrong with her cake we could figure something out! Wow, what a great bride to have for making my first wedding cake!


So based on the main requirement of needing to feed 200 people I decided to go with a square cake. I used a 16" square double layer cake for the bottom tier (feeds 128) and then a 12" square double layer cake for the top tier (feeds 78)...perfect exactly 200 servings! I baked all the cakes on Thursday and did a crumb coat of icing to keep the cake moist. On Friday I did the final coat of buttercream icing and tried as best I could to get it smooth...now this is one thing I still need to work on more.


Then it came time to stack the tiers. I had to call in some help and moral support from my friend Molly (the one that got me the cake job). I made sure to put plenty of dowel rods in the bottom tier so that there could be no chance of the top tier crushing the bottom cake (this was my worst fear). I mean if the cake had collapsed there would be no time to remake a new one in time for the wedding. Luckily everything went as planned when the tier was stacked. I added a touch of black to the cake using a 1 1/2" satin ribbon that I wrapped around the bottom edge of each tier. I love the way this looks simple and clean.


Then it was on to the fun part, adding all the decorations. I decided to go with calla lilies for the cake. They are such a simple yet elegant flower and I think they look great on cakes. I'm so glad my cake decorating teacher taught me how to make these a few weeks ago out of fondant.


The "W" monogram is also made out of black and white fondant.


Here's a close up of the top of the cake with a cluster of calla lilies.


I added a smaller group of flowers to the sides of the top tier to add some balance.


And finally it was time to deliver the cake to the Battleship. I think the part that caused me the most stress in this whole experience was anticipating the delivery of the cake. Knowing that I had made the cake successfully but still had to get it from point A to point B had my stomach in knots. What if I dropped the cake, what if it collapsed during the drive, what if I tripped while carrying it...these were all thoughts going through my head. I had to call in another friend Renie to help with the delivery. The seats in her car can be laid down flat so that I could sit in the back and watch the cake while she drove. Thank goodness we only had to drive the cake about 6 miles and nothing bad happened. This picture is proof that the cake was delivered successfully! YEAH!

When I arrived with the cake I saw Cammie and some of her family and they all were so pleased with how it turned out! The reactions and compliments they gave me made me feel great about the cake!

So there you have it, my first wedding cake adventure!

Friday, March 19, 2010

Sugar Flowers & A Secret...


I've got a secret...do you want to know what it is? Well I don't know if I can tell you just quite yet, but I will leave you with a few hints so you will have to check back at the end of the weekend when the secret is revealed! I've been working on a really really really big project this week and it involves butter (I mean LOTS of BUTTER...enought BUTTER to make Paula Dean proud!), SUGAR (one of my favorite baking ingredients) and flowers! So to tempt you a little bit I will leave you with some pictures of some of the cutest and pretty simple fondant and gum paste flowers I learned how to make this week!

I am currently taking my 2nd Wilton cake decorating class and it is all about Fondant & Gum Paste. Fondant I have used before, but only on a few occasions and gum paste I had never used until the other day! Wow it is amazing the things you can make with this stuff! This pink flower above is called the "fantasy flower" and is made using heart shape cookie cutters...who whould have thought something so simple could turn into something so beautiful!


Here are some simple daisies. I just love these gum paste flowers. With the first day of Spring starting tomorrow, I can envision using these on cakes and cupcakes in a wide variety of fun and vibrant colors!


Here's a carnation. Such a delicate flower full of layers and ruffles. This flower is a little more tricky to make than the others, I was having trouble getting my edges to ruffle up to create the layering effect.


And who doesn't love a calla lily. This flower is also made using a heart shape cookie cutter. I love the simplicity and elegance of this flower.

I'm thinking about doing a flower tutorial sometime soon so I can show you how to make each of these flowers step by step. Anyone interested?

Well I must get back to my BIG project in the kitchen...and it involves one of the flowers you have just seen. Any thoughts as to which flower is going to be featured in the biggest baking project to ever take place in my kitchen, well then leave me a comment and let me know!

Don't forget to check back by the end of the weekend when the big and hopefully successful project is revealed! I'm getting a little nervous!

Have a great weekend!

Wednesday, March 17, 2010

Cupcake a Week: St. Patrick's Day Green Velvet


Happy St. Patrick's Day! Hope everyone remembered to wear some green today! I've never really been one to get into all the crazy St. Patty's Day festivities, but my favorite color is GREEN and I needed a cupcake of the week recipe so I figured why not make a cupcake to fit the theme! And how cute is this mini cupcake pedestal???? This is my newest addition to my baking display pieces and I absolutely love it! My friend Molly gave this to me for my birthday and I have been dying to use it for a special occasion! Don't worry this won't be the last time you see this cupcake pedestal featured on my blog...afterall, I still have oh about 41 more weeks left this year to post a "cupcake a week" recipe so I'm sure you will be seeing it featured in many more photos to come! Thanks Molly for such a fun gift!


I picked up these Wilton St. Patty's cupcake wrappers at Michael's a few weeks ago since I knew I would be doing some cupcake baking! Cupcake wrappers have gotten to be so fun these days. When I was a kid all I remember seeing were the 3 pack of pastel pink, yellow and blue wrappers...wow have the times changed since then! Wrappers of all shapes, sizes, textures, colors, themes...there is sure to be something out there to celebrate each and every special event these days...and the latest craze seems to be cupcake kits with party themes and matching cupcake toppers! Whoever thought of that idea is a genius!


So now that we've got a cute cupcake wrapper, let's make a matching cupcake to go inside, shall we? Don't be afraid of the green batter though...it is super tasty! Basically it is the recipe for a traditional red velvet cake with the red food coloring swopped out for green food coloring.


I love how vibrant the cakes baked up. Now they just need some cream cheese icing and a few green sugar sprinkles and they will be ready to go!


These went to work with my husband today and all of his co-workers loved them!


Green Velvet Cupcakes (adapted from Martha Stewart's Red Velvet Cupcakes)
Makes 24 cupcakes

Ingredients:
-2 1/2 cups all-purpose flour
-1 tablespoon cocoa powder
-1 teaspoon salt
-1 1/2 cups sugar
-1 1/2 cups vegetable oil
-2 large eggs, room temperature
-1 oz green food coloring
-1 teaspoon vanilla extract
-1 cup buttermilk
-1 1/2 teaspoons baking soda
-2 teaspoons distilled white vinegar

  • Preheat oven to 350 degrees. Line standard cupcake tin with paper liners.
  • Whisk together flour, cocoa and salt.
  • With an electric mixer on medium-high speed, whisk together sugar and oil until combined. Add eggs, one at a time, beating until each is incorporated, scraping down sides of bowl as needed. Mix in food color and vanilla.
  • Reduce speed to low. Add flour mixture in three batches, alternating with two additions of buttermilk, and whisking well after each. Stir together the baking soda and vinegar in a small bowl (it will foam); add mixture to the batter, and mix on medium speed 10 seconds.
  • Divide batter evenly among lined cups, filling each three-quarters full. Bake for 16 minutes or until cake tester inserted in centers comes out clean. Cool completely and then ice with cream cheese frosting.
Cream Cheese Frosting

Ingredients:
-8 oz cream cheese, room temperature
-1 1/2 sticks unsalted butter, room temperature
-3 cups confectioners' sugar
-1/2 teaspoon vanilla extract

  • Beat butter and cream cheese with electric mixer on medium-high speed until fluffy, 2 to 3 minutes. Reduce speed to low. Add sugar, 1 cup at a time, and then vanilla and mix until smooth.
  • Place icing in piping bag fitted with round tip 1A and swirl on frosting. Sprinkle with green sugar crystals. Take a bite!
ENJOY!

Friday, March 12, 2010

Cupcake a Week: Banana & Chocolate


This recipe is for all you banana and chocolate lovers! I had 3 very ripe bananas that were staring me in the face this week just begging to be eaten. It seems every time I have ripe bananas I make the same old loaf of banana bread or a batch of muffins that I have made a thousand times. This week I wanted to switch things up a bit and try a banana cupcake! I even decided to get a little crazy and make them into a sandwich style cupcake filled with a layer of icing and another swirl of icing on top! Let me just warn you these can get a little messy when eating, but they are oh so worth it!


I have this fabulous cake book, Confetti Cakes that I used for the recipe. The book is crammed full of some of the most elaborately decorated cakes, cupcakes, cookies and yummy recipes I have ever seen. If you don't already own this book, I highly recommend picking up a copy! I find myself just thumbing through the pages regularly looking at all the details, techniques and vibrantly colored pages...talk about some inspiration on every page!

Banana Cupcakes (recipe from Confetti Cakes)

This recipe can be used for three 9-inch round cake layers, 1 half sheet (13 x 18 inches) or 24 cupcakes! (I cut this recipe in half because I only had 3 bananas and it still turned out moist and delicious)

Ingredients:

2 teaspoons baking soda
3 1/4 cups plus 1 1/2 tablespoons all-purpose flour
1 cup unsalted butter
2 1/2 cups granulated sugar
4 large eggs
1 cup sour cream
1 tablespoon pure vanilla extract
6 very ripe bananas

  • Preheat the oven to 350 degrees. Line cupcake pan with paper liners or spray with cooking spray (I used cooking spray b/c I wanted to be able to slice the tops off my cupcakes and make them into sandwiches).
  • In a large bowl, sift together the baking soda and flour. Set aside.
  • Peel the bananas and mash them in a bowl. Set aside.
  • In the bowl of a standing mixer fitted with a paddle attachment, combine the butter and sugar and beat on medium speed until smooth.
  • Set the mixer to low speed and add the eggs, one at a time scraping thoroughly between each addition.
  • Add the sour cream and vanilla and beat until thoroughly combined.
  • Add the flour mixture in two batches, scraping down the bowl after each addition.
  • Add the bananas and beat until just combined. Do not overmix.
  • Divide the batter among the prepared pans. Bake for 18-22 minutes.
  • Allow cupcakes to cool. Using a serrated knife cut the tops off the cupcakes and swirl a layer of chocolate buttercream icing on the cake. Put the top of the cupcake back on and then swirl some more buttercream on top.
Have a great weekend!

Wednesday, March 10, 2010

Chocoflan


Here's a recipe my dad shared with me a few weeks ago for a Chocoflan cake. It was a huge hit with his friends and everyone raved about how good the combination of cake and custard was. I've never made flan before, but remember learning about it and tasting it in my seventh grade spanish class...wow that was a long time ago! I wasn't really a huge fan of flan way back when, but I have to admit this cake sure did change my opinion of this sweet custard dessert.


This past weekend I went to a Mexican themed party so I figured this Chocoflan cake would be the perfect dessert to take! How good does this caramel drizzle and pecan topping look on top of the flan custard? It was hard to not sneak a taste of this cake before the party.


The way this cake bakes is pretty neat. You make the chocolate cake mixture in one bowl and pour it into a buttered bundt pan that has been drizzled with caramel first. Then you make the custard mixture in a blender and pour the custard over the chocolate cake. The magic of this cake occurs in the baking...the custard sinks to the bottom of the bundt pan and the cake rises to the top.


Don't you wish you had a piece of this delicious cake? Well here's the recipe, so what are you waiting for, go whip one up for your next party!

Chocoflan (recipe from Marcela Valladolid, Food Network)

Ingredients
-12 cup capacity bundt pan
-softened butter, to coat pan
-1/4 cup cajeta or caramel sauce

For the cake:
-10 tablespoons butter, room temperature
-1 cup sugar
-1 egg, room temperature
-1 3/4 cups all-purpose flour
-3/4 teaspoon baking powder
-3/4 teaspoon baking soda
-1/3 cup cocoa powder
-1 1/4 cups buttermilk

For the flan:
-1 (12 oz) can evaporated milk
-1 (14 oz) can sweetened condensed milk
-4 oz cream cheese, room temperature
-3 eggs
-1 tablespoon vanilla extract

For garnish:
-1/4 cup cajeta or caramel sauce
-1/4 cup chopped pecans

  • Put an oven rack in the middle of the oven and preheat to 350 degrees.
  • Coat a bundt pan with a little butter, then coat the bottom with 1/4 cup cajeta and put it in a large roasting pan. (The roasting pan will serve as a water bath during baking.)
  • For the cake: Add the butter and sugar to a bowl and using an electric hand mixer or stand mixer, beat until light and fluffy, then beat in the egg. Sift together the flour, baking powder, baking soda and cocoa in a medium bowl. Beat 1/3 of the flour mixture, and 1/2 of the buttermilk into the egg mixture. Repeat, ending with the flour mixture. Blend until well incorporated.
  • For the flan: In a blender, combine the evaporated milk, condensed milk, cream cheese, eggs and vanilla. Blend on high for 30 seconds.
  • Scoop the cake batter into the prepared bundt pan and spread evenly. Slowly pour the flan mixture over the cake batter. Cover with foil and add about 1-inch of hot water to the roasting pan.
  • Carefully slide the pan into the oven, and bake 1 hour, until the surface of the cake is firm to the touch, or an inserted toothpick comes out clean. When cake is done, remove from the water bath and cool completely to room temperature, about 1 hour.
  • Invert a large, rimmed serving platter over the bundt pan, grasp tightly together, giggle a little an flip over. Remove the pan and scrape any remaining cajeta from the pan onto the cake, garnish with chopped pecans and serve!
  • Cook's Notes: The batters may appear to mix when you pour them into the pan, but they completely separate while baking, with the flan ending up on the bottom when it's inverted. I like eating it warm, but traditionally, it is chilled 24 hours before serving.
  • Cajeta is a thick and creamy spread or paste made with caramelized sugar and milk. It is used as as dessert on its own or as a topping. Also known as "dolce de leche", it is sold in many supermarkets, Latin specialty markets or onlion. It can be substituted with a thick caramel sauce.
ENJOY!

Saturday, March 6, 2010

Blackberry Streusel Muffins


Saturday is off to a great start. I got to sleep in until my body decided it was ready to wake up today. This was the first time in 6 months, that I didn't have to wake up to the sound of my alarm going off at 4:30AM to get up and do a 16, 18 or 20 mile run. Since September 2009 I have been coaching and training for several marathons, which finally came to an end last Sunday at the New Orleans Rock N' Roll Marathon. So today when my eyes opened for the first time at 7:52AM I happily rolled out of bed and headed to the kitchen to make a homemade breakfast. No more eating bagels with peanut butter with my eyes half open in the dark for a pre-run breakfast.

Today, I wanted to celebrate some normalcy in my life again, which consisted of sleeping in and making a homemade breakfast. Growing up I never was really a big breakfast fan, I would always just eat a pop tart, toaster struddle or a bowl of cereal. But over the last couple of years, I have come to realize that breakfast really is the most important meal of the day and the one that gets your body moving in the morning. There are so many great breakfast foods out there that I have grown to love like eggs, bacon, homemade pancakes, cheese grits and I could go on and on. Now I eat eggs almost every morning, thanks to my husband, he knows how to cook eggs all kinds of ways, sunny side up, over easy, hard boiled, scrambled and even makes omelets crammed full of all kinds of veggies and cheese.


This morning I wanted to step up to the plate though and make eggs for him to accompany the blackberry muffins I had been wanting to make for a few weeks now. I took the easy way out and made sunny side up eggs, all you have to do is crack them open in a skillet and let them cook for a few minutes, it is just that simple! I think they turned out pretty good, except for the little piece of egg white that is creeping into one of the yolks.


Well now that I have rambled on and on about eggs...I have realized that the whole meaning for this post was for the blackberry muffins! I absolutely love blackberries. My husband took me to my first blackberry and blueberry farm soon after we started dating during college about 8 years ago. Ever since then I have been hooked on these tiny little berry clusters! Blackberry cobbler is my all-time favorite, but I wanted to see if I could come up with a muffin recipe that I could enjoy just as much! Right now my freezer is stocked full with bags of frozen blackberries. When I was home in KY at Christmas we stopped by my grandparents house and they loaded us up with frozen bags full of blackberries. My grandfather plants rows of blackberry plants every year in his back yard, picks them when they are ripe and then freezes them to use throughout the year in jams, cakes, cobblers, etc. I figured the time was long over due to use up some of these delicious berries.


I just love how vibrant the blackberries look inside of the muffin. Sometimes blackberries are a little tart so before I incorporated them into the batter I sprinkled them with some sugar and cinnamon first to add a little extra sweetness.

My favorite part to any muffin is when there is streusel on top. I just love the crunchy combination of brown and white sugar and cinnamon.

Blackberry Streusel Muffins

Ingredients:
-1/2 stick butter, melted
-2 eggs
-1 cup milk
-1/2 cup applesauce
-1 1/2 cups all-purpose flour
-1 1/2 cups wheat flour
-1 cup sugar
-2 teaspoons baking powder
-1 teaspoon baking soda
-1/2 teaspoon salt
-1 1/2 cups blackberries, fresh or frozen

Streusel Topping:
-1/2 cup all-purpose flour
-1/4 cup brown sugar
-1/4 cup sugar
-1/2 stick butter, cut into tiny cubes
-1 teaspoon cinnamon

  • Preheat oven to 350 degrees. Spray muffin pans with cooking spray. I made 6 jumbo muffins and 8 standard muffins with this recipe.
  • Combine the butter, eggs, milk and applesauce in a medium bowl.
  • Combine the all-purpose flour, wheat flour, sugar, baking powder, baking soda and salt in a large bowl.
  • Add the wet ingredients to the dry ingredients and stir just until combined.
  • Add 1 tablespoon sugar and 1/2 teaspoon cinnamon to blackberries and mix to coat. Stir in the blackberries.
  • Spoon batter into prepared muffin pans about 2/3 full.
  • Combine all streusel ingredients together in a bowl and mix together by running a fork through the butter to create pea size streusel crumbs.
  • Bake standard size muffins for 20 minutes and jumbo size muffins 22-24 minutes.

ENJOY!

Thursday, March 4, 2010

Cupcake a Week: Vanilla & Chocolate Swirl


Vanilla or Chocolate...Chocolate or Vanilla???? I often find myself contemplating which flavor to choose when it comes time to eating cake or ice cream. When I'm at a wedding and there are both chocolate and vanilla slices of cake, I'm that over indulgent guest that eats one piece of cake like all the other guests, but then when no one is watching sneaks back up to the cake table and helps myself to a second piece of cake to try another flavor. I know I am not the only one who has done this right??? Please tell me some of you also raid the cake table for extra servings. This is a rare chance when you get to eat a super moist, delicious, high quality ingredient cake made from scratch from a well known bakery...I mean this is one sugary slice of heaven, or two you just can't resist.

But if you aren't going to be heading to a wedding anytime soon and are craving something both chocolate and vanilla, then this marbled cupcake recipe is just what you need!


And to take it even one step further, not only is the cake a combo of vanilla and chocolate but so is the icing! You get the best of both worlds all in one little cake! I made one batch of vanilla buttercream icing and one batch of chocolate buttercream icing then combined them side by side in a piping bag with the star tip and swirled it on top. Then added some chocolate jimmies.


Just looking at the swirls of vanilla and chocolate icing reminds me of my childhood and going up to the local convenient store on a hot summer night and ordering swirled soft serve ice cream. YUM!


Marble Cupcakes (recipe from Martha Stewart's Cupcakes book)

Makes 16 cupcakes

Ingredients:
- 1 3/4 cups cake flour (not self-rising), sifted
-2 teaspoons baking powder
-1/2 teaspoon salt
-1/3 cup milk, room temperature
-1/3 cup heavy cream, room temperature
-1/2 cup (1 stick) unsalted butter, room temperature
-1 cup granulated sugar
-3 large eggs, room temperature
-1 teaspoon pure vanilla extract
-1/3 cup unsweetened Dutch-process cocoa powder
-1/4 cup boiling water

  • Preheat oven to 350 degrees. Line standard muffin tins with paper liners. Sift together cake flour, baking powder, and salt. Combine milk and cream.
  • With an electric mixer on medium-high speed, cream butter and granulated sugar until pale and fluffy. Add eggs, one at a time, beating until each is incorporated, scraping down sides of bowl as needed. Beat in vanilla. Add flour mixture in three batches, alternating with two additions of milk mixture, and beating until combined.
  • To make chocolate batter, measure out 1 cup batter, and transfer to another bowl. Combine cocoa and the boiling water in a bowl. Stir into reserved 1 cup batter.
  • Fill prepared cups with alternating spoonfuls of vanilla and chocolate batter, filling each three-quarters full. Run the tip of a paring knife or wooden skewer through the batter in a figure-eight motion to make swirls. Bake, rotating tins halfway through, until tops are golden and cake tester inserted in centers comes out clean, about 20 minutes. Transfer tins to wire racks to cool completely before removing cupcakes. Cupcakes can be stored overnight at room temperature, or frozen up to 2 months, in airtight containers.
*Martha recommended dusting marble cupcakes with confectioners' sugar, but I decided to top them off with buttercream icing instead....either way they will taste delicious!
  • Frost with a combination of vanilla and chocolate buttercream. Place a large star decorating tip into a piping bag and fill one side with vanilla and the other side with chocolate buttercream. Hold bag and swirl icing in clockwise motion on top of cupcakes to create a swirl.

Billy's Vanilla Buttercream (recipe from Martha Stewart's website)

Makes enough for 30 cupcakes
Note: I cut the recipe below in half and still had left over icing.

-1 cup (2 sticks) unsalted butter, room temperature
-6 to 8 cups confectioners's sugar
-1/2 cup milk
-1 teaspoon pure vanilla extract

  • In the bowl of an electric mixer fitted with the paddle attachment, cream the butter until smooth and creamy, 2 to 3 minutes. With the mixer on low speed, add 6 cups sugar, milk, and vanilla; mix until light and fluffy. If necessary, gradually add remaining 2 cups sugar to reach desired consistency.

Billy's Chocolate Buttercream (recipe from Martha Stewart's website)

Makes enough for 30 cupcakes
Note: I cut the recipe below in half and still had left over icing.

-2 cups (4 sticks) unsalted butter, room temperature
-12 ounces semisweet chocolate, melted and cooled
-3 tablespoons milk
-1 1/2 teaspoons pure vanilla extract
-5 cups confectioners' sugar

  • In the bowl of an electric mixer fitted with the paddle attachment, beat butter until smooth and creamy, 2 to 3 minutes. With mixer on low speed, add chocolate until just combined. Add milk, vanilla, and sugar; mix on medium until well combined, being careful not to overmix.
ENJOY!

Related Posts with Thumbnails